
Exporting projects
You can export a project (in whole, or specific parts) into a file that can be used with another Blueprint instance.
Note: Relationships to or from artifacts outside the scope of the exported project are not retained.
To export an entire project:
-
Open the Instance Administration Console.
-
Click the Projects link (or, the Projects button on the ribbon).
-
Select the project you want to export.
Tip: Try using the search field to find projects faster.
-
The Full Export option is selected by default. Click Next.
The project export job is placed in the Job Management queue. You can view and access it in the
Tip: The quickest way to download the exported project is by using the corresponding
To partially export a project:
-
Open the Instance Administration Console.
-
Click the Projects link (or the Projects button on the ribbon).
-
Select the project you want to export.
Tip: Try using the search field to find projects faster.
-
Click Partial Export.
-
Indicate which parts of the project will be exported by adding desired folders and artifacts to the Scope of Export list:
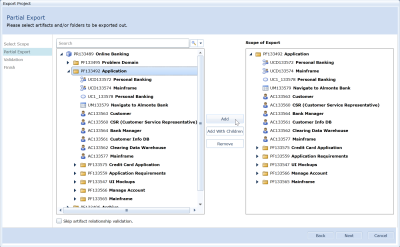
The following actions can help you find and select desired project contents:
- Entering a folder or artifact name in the Search box, and clicking the Search icon to filter the list to partial or full matches.
- Selecting a specific artifact type from the Search drop-down to filter the list to that type. Entering a name in the Search box then filters the results to matches.
- Selecting multiple artifacts or folders with the keyboard and mouse (for example, Shift-clicking to select ranges, or Ctrl-clicking to select or deselect individual items).
- Using the Add with Children button to include child folders and artifacts of selected items.
-
If you do not wish to review potentially lost artifact relationships, select the Skip artifact relationship validation check box.
Skipping the validation process will export the partial project as is, and any relationships with artifacts outside the scope of the exported project will not be retained.
-
Click Next.
-
If the validation process has not been skipped, and potentially lost relationships exist, a summary is displayed. Resolve relationships issues through the Selected Resolution column:
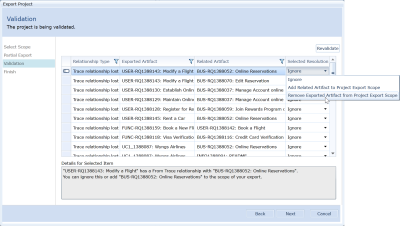
- Ignore: the relationship with the external artifact will not be retained
- Add Related Artifact to Project Export Scope
- Remove Exported Artifact from Project Export Scope
At any time, clicking Revalidate removes resolved relationship issues from the list, and checks the remaining artifacts for further relationship impacts.
Note: Adding a related artifact may introduce more external relationships to the project scope; removing an artifact may introduce more lost relationships with other project artifacts. If retaining relationships is important for the project export, always click Revalidate after selecting resolutions and review the impacts.
When you have resolved all affected relationships, or are satisfied with the extent of your resolutions, click Next.
- The project export job is placed in the Job Management queue. Click Close.
Note: The amount of time the queued project export job requires depends on the size of the project, and how busy the job queue is.
- To access the Job Management queue, leave the Instance Administration Console by clicking Close Instance Administration on the ribbon.
-
Once you are in the main Blueprint experience, access the project export file in one of two ways:
- Notifications: When the job has completed, a notification icon (
 ) appears in the status bar, in the bottom leftmost part of the application window. (
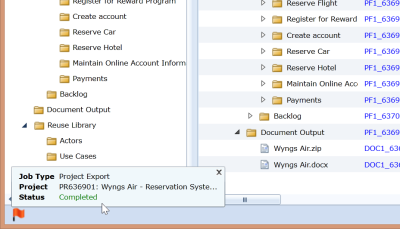
Click the notification icon. If a Completed job status appears, click anywhere in the dialog.
In the Project Export Download dialog that appears, click the Download button.
- The Job Management queue: Locate the job in the Job Management dialog (Menu button, Manage, Jobs). (
Confirm its status is Completed. Click the job row, then click Show Result.
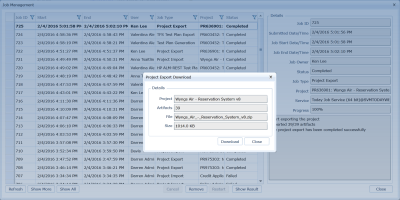
In the Project Export Download dialog that appears, click the Download button.
- Notifications: When the job has completed, a notification icon (


After you have exported a project, you can import the project to the same instance or a difference instance. Learn more about what data is preserved when you import a project.