
Office Document Template Authoring: Getting Started Tutorial
Step 1: Install the Blueprint template authoring add-in for Microsoft Office
The template author needs to install the template authoring add-in on the computer that will be used to author the templates. It only needs to be installed once.
Note: The Blueprint template authoring add-in works with:
- Microsoft Office 2007
- Microsoft Office 2010
- Microsoft Office 2013 (Blueprint 5.3 and later)
To install the add-in, perform the following steps:
- Download the add-in from the Blueprint customer portal. The add-in is available in 32 bit and 64 bit, depending on your operating system.
- Extract the .zip file.
-
Run the installer (BlueprintAddinInstall.exe)
Note: Contact Blueprint Support to obtain your license key.
- Run the post-install batch file (PostInstall.bat)
After you have installed the add-in, the following tabs will appear in Microsoft Office:

Step 2: Download and open a sample template
Template authors can create templates from scratch, but you may prefer to start with a sample template. You can download the sample templates and access them at any time. New sample templates are added periodically.
To download and open a sample template:
- Download the sample templates from the template authoring website (http://documentation.blueprintcloud.com/DeveloperCenter/TemplateAuthoring/).
- Extract the .zip file.
-
Open one of the sample templates:
Template Filename Format Description Business Processes.docx Microsoft Word Creates a Microsoft Word document that includes only business process diagrams. ExcelExportTemplate.xlsx Microsoft Excel Creates a spreadsheet that provides information about all selected artifacts.
Glossaries.docx Microsoft Word Creates a document that includes the terms and definitions in a glossary artifact. SingleArtifact.docx Microsoft Word Creates a document that provides detailed information about a single artifact. TextualRequirements.docx Microsoft Word Creates a document that displays information about all selected requirements that have a Base Type of Textual Requirement. Traceability Matrix.docx Microsoft Word Creates a document that displays a traceability matrix. WordExportTemplate.docx Microsoft Word Creates a document that displays information about all selected requirements in a table.
Step 3: Download your Blueprint project XML data and add it as a data source
Your Blueprint project XML data can be used to simplify the template authoring process. After you have downloaded and added the XML file as a data source, you can access the data as you customize your template. You only have to download your Blueprint project XML data once, but you may want to download it more frequently to ensure you are creating a template using the most up-to-date data.
To download your Blueprint project XML data:
- Login to Blueprint.
-
Open the project that contains the data that you want to use for authoring your templates.
Note: Template authoring is much easier if you are using actual project data because you can accurately test your template as you customize it.
- Open the Project Admin Console.
- Click Project Details.
- Click the Open link under the Extract Project XML Data heading.
- Save the file.
- Return to the sample template in Microsoft Office.
- Click the Blueprint Manager tab.
- Click Data Sources. The Data Sources dialog appears.
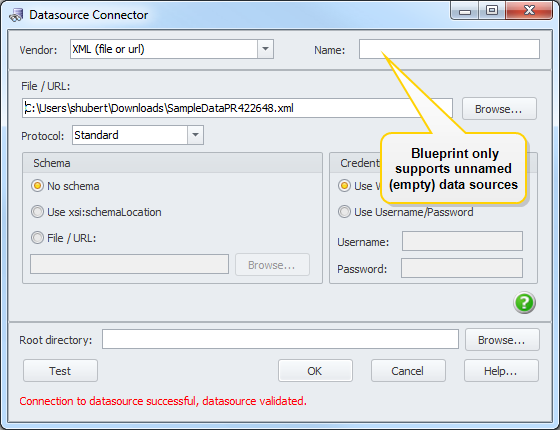
- Click Add. The Data Source Connector dialog appears.
- Change the Vendor field to XML (file or url).
- Click Browse and find the .xml file.
-
Click the Test button to test the data source:

- Click OK.
Step 4: Customize and test the template
You can easily customize many aspects of your template using basic Microsoft Office features. For example, you may want to add a title page, table of contents, and legal disclaimer. You may also want to change the font size and color, or add a header and footer with your company logo. These types of changes can be implemented by simply using Microsoft Office features to modify the template.
You may also want to change the Blueprint data that appears in the generated document. This type of customization requires changes to template tags.
Tip: To learn more about XPath, please refer to W3Schools XPath tutorial at http://www.w3schools.com/xpath/default.asp.
Step 5: Add the template to Blueprint
After you're happy with your template, you can add it to Blueprint so users can generate documents directly from Blueprint. You only have to add the template to Blueprint once, unless you decide to change the template and upload a new version. Many organizations upload a variety of templates to Blueprint so users can generate office documents for specific purposes.
Note: Templates exist in Blueprint at the project level, so make sure you add the template to the correct project. You can add the template to multiple projects, but you may run into some issues if the structure of the projects are different.
To add a template to Blueprint:
- Open the Office Document Templates tab.
- Open the Project Admin Console.
- Click Office Integration > Office Document Templates on the ribbon (Project Admin tab, Project group).
- Click the New button on the ribbon (Project Admin tab, Actions group).
-
Configure the settings for the new template:
- Include Files: If selected, the generated document is packaged in a .zip file with the documents and attachments.
- Rich Text Formatting: If selected, any rich text formatting in Blueprint is preserved in the generated document. If Rich Text Formatting is selected, the Preserve font sizes for rich text properties setting is also automatically selected. The Preserve font sizes for rich text properties setting retains the font size formatting you have applied to rich text properties such as Description.
- Include Open Discussions: If selected, open discussions are included in the generated document.
- Include Closed Discussions: If selected, closed discussions are included in the generated document.
-
Attach source data to report output: If selected, the generated document is packaged in a .zip file with the project XML data that was used to generate the document.
The project XML data can be useful if:
- you want to author a template using data and image references from your project.
- you are debugging a problem with the template you are using
- you want to provide Blueprint support with the project XML data that generated the template
- Upload the office document template that you created.
- Click the Upload link.
- Locate the file that you want to upload.
- Click Open.
- Click Save.
Step 6: Generate an office document
All users in Blueprint have the ability to generate office documents using the templates that have been added to Blueprint. Users generate office documents frequently in order to produce documents using the most current information in Blueprint.
To generate an office document in Blueprint, simply open a project that contains the template and perform the following steps: