
Authoring document templates
Overview
Using the Blueprint template authoring add-in, you can create document templates for Blueprint. After you download and install the Blueprint template authoring add-in, you can begin creating document templates immediately.
Note: The Blueprint template authoring add-in works with:
- Microsoft Office 2007
- Microsoft Office 2010
- Microsoft Office 2013 (Blueprint 5.3 and later)
Note: The add-in looks slightly different in Office 2010 compared to Office 2007 but the features are the same.
Blueprint AutoTag is an add-in for Microsoft Office that facilitates the authoring of templates in Microsoft Word and Microsoft Excel. After you author a document template and add it to Blueprint, users can export documents and reports that convey critical, up-to-date information from Blueprint artifacts in a visually impressive format. Learn more about Blueprint AutoTag.
To simplify template authoring, download your project XML data and then add the file as a data source in Blueprint AutoTag.
Tip: You may be interested in downloading the Sample Word and Excel Document Templates prior to creating your own.
Components of template design
There are two main components of template design:
- Design
Design includes layout, fonts, static images, colored text, headers, footers, and many other design features. With a few exceptions, design elements are created and edited using Microsoft Office's built-in tools. - Data
Data placeholders, known as tags, are inserted into document templates. When a document is generated in Blueprint, the tags in the template are replaced with actual data from your Blueprint project. In other words, templates contain tags and reports contain data. In your document template, each tag is contained within angle brackets so you can easily distinguish tags from regular text.
Blueprint AutoTag User Interface
Blueprint AutoTag adds two tabs, Blueprint and Blueprint Manager, to Microsoft Word and Excel. On the Blueprint tab, you create and edit tags. In the Blueprint Manager tab, you perform miscellaneous tasks. Read more about the features available on the Blueprint and Blueprint Manager tabs.
Understanding the Blueprint AutoTag Features on your Microsoft Office Ribbon
After Blueprint AutoTag is installed, you will notice that two new tabs appear on your Microsoft Office ribbon:

The Blueprint tab and the Blueprint Manager tab are all part of the Blueprint AutoTag add-in. The primary tab is the Blueprint tab where you can create and edit any tag.
The Blueprint tab

The following table describes each feature available on the Blueprint tab on the ribbon:
| Icon | Name | Description |
|---|---|---|

|
Pods | Pods contain pre-defined groups of tags that you can drag and drop into document templates. |

|
Data Bin | The Data Bin contains all the data that is accessible from a particular document template. You can drag and drop items from the Data Bin into your template. |

|
Tags | The reports allow you to insert a variety of data types, including single pieces of data, images, tables and more. Each type of data is associated with a tag type. When you click the Tag icon, a pop-up window shows you all the tag types. |

|
Validate Tags | You can check to make sure tags are formatted properly by using this icon. |

|
Select Tag | This selects the tag you have your cursor on. It is especially useful when working with text tags. |

|
Delete Tag | When you place your cursor on a tag and click this icon, the tag is deleted. |


|
Next and Previous | Use these icons to quickly jump from tag to tag in a template. |

|
Output | To run a report, you click this icon and then choose the desired output format (DOCX, XLSX) |

|
Select box | This contains the select statement, also known as a call or a query to a data source, that tells the template what data to retrieve when the report is run. |

|
Evaluate | When you select a tag and click the Evaluate icon, a pop-up window shows you the real-time data associated with that tag. |

|
Wizard | The wizard walks you step by step through selecting a subset of data to use in a report. |
The Blueprint Manager tab
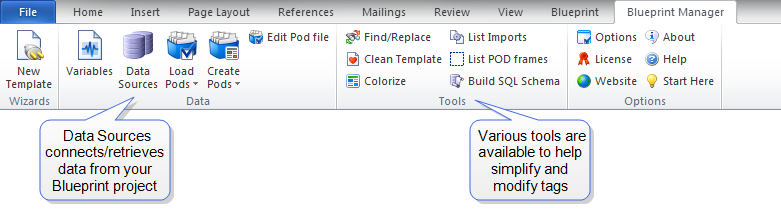
The following table describes each feature available on the Blueprint Manager tab on the ribbon:
| Icon | Name | Description |
|---|---|---|

|
New Template | The New Template wizard walks you through connecting a blank template to a data source. |

|
Parameters | Useful when working with a template containing variables, parameters let you find undetermined variables and enter default values and types. |

|
Data Sources | This lists all the data sources a template is connected to, and allows you to add new data sources. |

|
Load Pods | This icon lets you load groups of tags (pods) into a template. |

|
Create Pods | Create Pods lets users create groups of tags that can be used in other templates. |

|
Edit RDLX | This lets you edit pod files. |

|
Clean Template | This tool cleans your template by creating a new template that scrubs the file, closes your existing template, opens the new scrubbed template, deletes the old file, and renames the new file to the name of the original file. |

|
Replace | This tool lets you find and replace text in tags throughout a document. |

|
Options | AutoTag's options control how tags are read and how they display in your template. |

|
License | You can update and view your license key via this icon. |

|
Website | This links to the Blueprint website. |

|
About | Basic info about AutoTag, such as version number and license expiration date (if any). |

|
Help | This links to the template authoring help on the Blueprint documentation website. |

|
Start Here | Links to resources. |
Now that you understand the interface of AutoTag you can move onto Data Sourcing which will allow you to insert data into AutoTag so you may format it to your liking.
Learn More
Office Document Template Authoring: Getting Started Overview