
Getting Started with Blueprint
Overview
What is Blueprint?
Blueprint is a powerful requirements solution that allows users to collaboratively author, validate, and manage requirements for software projects. It also provides integration capabilities with other systems. Blueprint is designed for anyone who authors or works with requirements, including but not limited to: business and system analysts, architects, developers, quality assurance analysts, business stakeholders and customers. Blueprint simplifies the entire requirements workflow by combining authoring, collaboration, review, and signoff capabilities in a single tool.
Blueprint allows project teams to not only document requirements in a textual format, but also to illustrate requirements using a variety of methods, such as use cases, diagrams, user interface mockups, and glossaries. It also provides administrators with the ability to create custom artifact types with custom properties. Blueprint users have the freedom to choose the most appropriate type of artifact to use for defining and communicating a requirement. In many cases, users may benefit by using multiple artifacts to define a requirement, and then establish relationships between the artifacts. Blueprint users also have the flexibility to choose the best strategy for organizing artifacts in their projects. The end result of this flexibility is clearly defined requirements that can be used to obtain feedback from stakeholders more effectively.
Blueprint further encourages collaboration through the use of discussions. Users can add comments and replies to any artifact or sub-artifact. This capability facilitates easy communication and discussion between project members. Additionally, Blueprint supports a review and approval process that requirement authors can use to more easily obtain feedback and approval from project stakeholders.
What are artifacts, folders, and projects?
An artifact refers to a requirement in Blueprint. Blueprint supports a variety of base artifact types, including: textual requirements, actors, use cases, UI mockups, business process diagrams, domain diagrams, generic diagrams, storyboards, documents, and glossaries. Each artifact type contains a set of default system properties. However, instance administrators can configure standard properties for each standard artifact type and project administrators can configure custom properties for each custom artifact type. Artifacts can be arranged in a hierarchy by simply dragging and dropping an artifact onto another artifact in the artifact list. Baseline and review artifacts are special types of artifacts that are stored in a special folder called Baselines and Reviews (located at the bottom of each project in the explorer panel).
A folder is a type of artifact that can contain any other type of artifact. Folders, like artifacts, can be organized in a hierarchy allowing you to better organize your requirements.
A project consists of a collection of artifacts. You can open multiple projects at one time. Blueprint supports various cross project operations. For example, you can perform cross-project searches, cross-project glossary referencing, and include use cases from other projects.
Navigating Blueprint
Blueprint consists of a few key screen components:
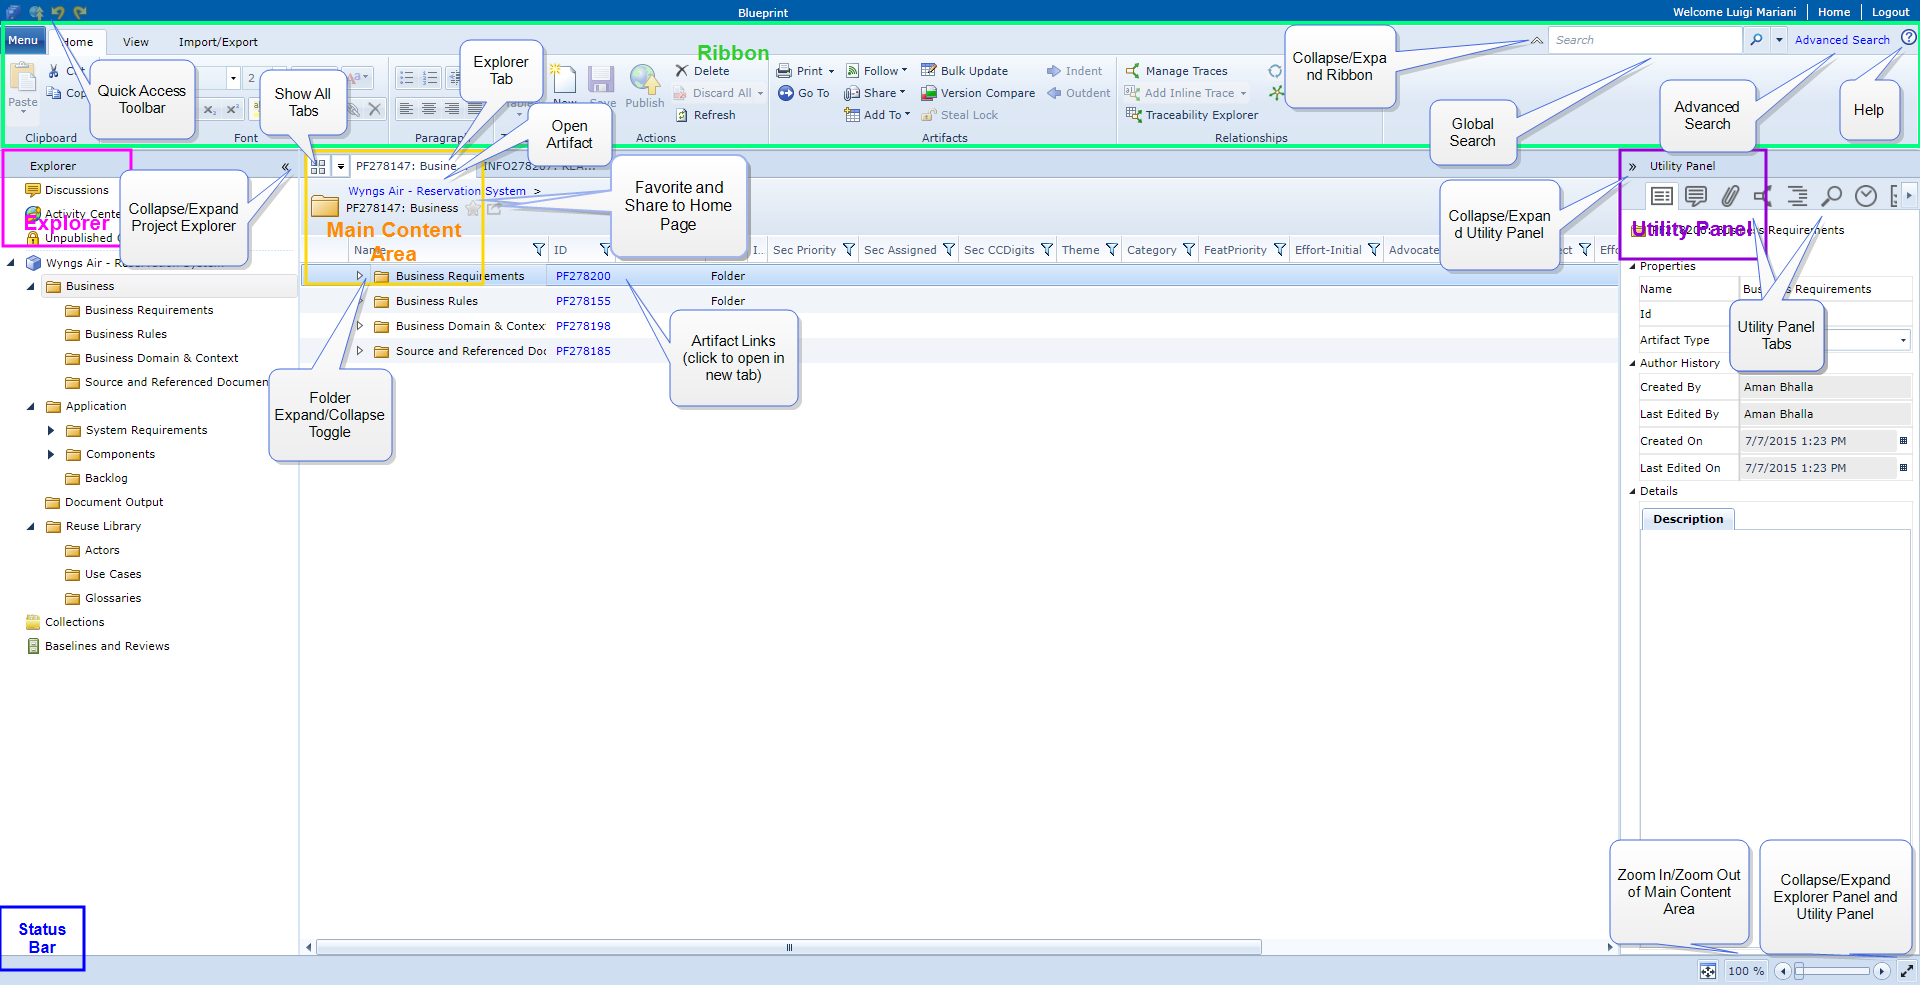
The explorer is the panel on the left that allows you to browse and navigate within your projects and folders. You can also access other features such as the discussion explorer, activity center, and your list of unpublished changes. When you select an item in the explorer panel, the content tab in the main content area is automatically refreshed with the new content.
The main content area is the component that you will use most frequently to interact with Blueprint. The main content area provides a tab-based interface that allows you to open multiple artifacts at one time. You can then switch between the artifacts by clicking the tabs at the top of the main content area. The tab furthest to the left is called the content tab. The content displayed on the content tab is automatically updated with the item that you select in the explorer panel.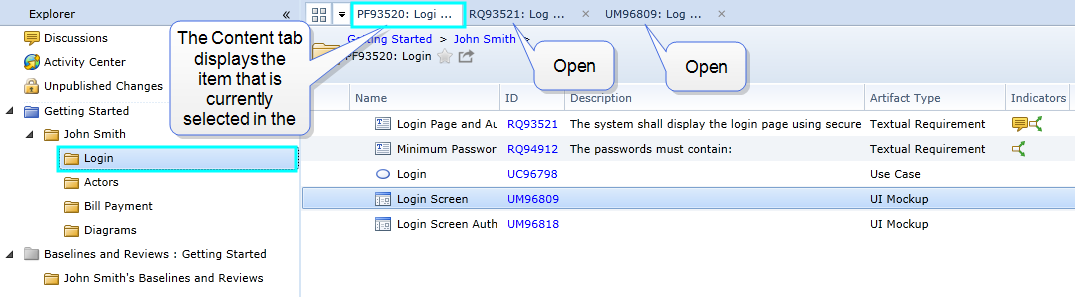
Blueprint's ribbon is designed to look and operate similar to the ribbon in Microsoft Office applications. You can use the ribbon to perform most tasks and operations in Blueprint. The ribbon always displays four tabs. A fifth tab, called the contextual tab, is sometimes displayed when you are viewing an artifact editor in the main content area, providing you with functions specific to that particular artifact editor. In addition to using the ribbon, you may want to try using the right-click context menu to improve your efficiency.
Refer to the utility panel when you want to view detailed information about the selected artifact. The utility panel contains the following six tabs: properties, comments, files, relationships, outline, browse, history, and reviews.
Artifact list
When the artifact list is displayed in the main content area, various columns of data provide you with information about the listed artifacts. Blueprint allows you to edit some of the data in these columns without opening the artifact. The artifact list can display the following columns of information:
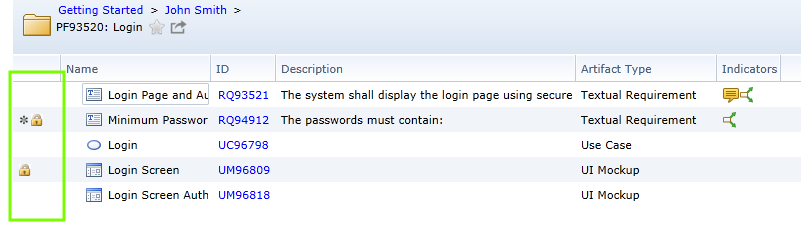
- The left most column of the artifact list always displays the status of the artifact. For instance, it displays an icon for your artifacts that locked
 (unpublished) and artifacts with your unsaved changes
  . If the artifact is locked by another user, you will see the read-only
  indicator.
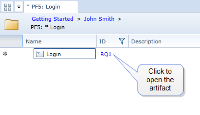
- You can click the artifact ID link at any time to open the artifact in a new tab. New artifacts are assigned a temporary ID until the artifact is published. Artifact IDs cannot be modified.
- You can edit the artifact Name, Description, and Type. You can also edit any custom properties associated with an artifact.
- The Indicators column displays various indicators depending on whether or not the artifact contains open discussions
 , file attachments and document references
  , or trace relationships
  . You can click these icons to view the associated information in the utility panel.
 - The Review Status and Is Sealed columns are special columns that apply to reviews and baselines only.
System Requirements
The following requirements must be met on each client system:
| Client System | |
|---|---|
| Hardware requirements |
|
| Software requirements |
The following system requirements only apply if you plan to use the Blueprint template authoring add-in for template development purposes:
|
Finding Help
If you need help while you are using Blueprint, click the help icon ![]() located in the upper right corner of the window.
located in the upper right corner of the window.
You may also be interested in the Blueprint eLearning modules for additional training.
Tutorials
The most effective way to learn Blueprint is to start using it. This section provides you with a step by step walk-through of Blueprint's basic features. After you complete these tutorials, you will be familiar enough with Blueprint to complete common tasks such as creating, modifying, and reviewing requirements. After you have used Blueprint for a short period of time, you will quickly recognize the flexibility that it offers. As your comfort level increases, you may want to start taking advantage of various shortcuts, and alternate ways of completing tasks.
The tutorials in this section are meant to be completed in order, from start to finish.
Logging in and accessing projects
-
Login to Blueprint:
- Open your web browser.
- Navigate to the Blueprint URL.
- Enter your user name and password.
- Click Login.
-
Open the Getting Started project. To open a project, click the application menu
 on the ribbon, and then click Open. If you cannot locate the Getting Started project, contact your Instance Admin for assistance, or use any available test project to complete the tutorials.
 -
Try increasing the size of the main content area by collapsing the explorer panel and the utility panel. Use the collapse and expand

 icons located in the top corner of the panels to show and hide the panel. You can also resize the width of the panels.
 -
Try increasing the size of the main content area by collapsing the ribbon. You can quickly expand and collapse the ribbon by double-clicking one of the ribbon tabs. You can also expand and collapse the ribbon by clicking the arrow icon
 located in the upper right corner of the ribbon.
 -
Click the Column Options button to configure the artifact list so that all columns of information are displayed. The Column Options button is located on the ribbon (View tab, Artifact List group).
Creating and viewing artifacts
Now that you are logged in, let's begin by creating some folders and start defining requirements. Folders provide you with flexibility in the way that you organize your artifacts. Some users may prefer to create a folder for each artifact type (use cases, UI mockups, and so on), while other users may prefer to organize requirements based on system components. For the purpose of this exercise, you will use a combination of these two methods. You will create a Login folder for your login requirements, but you will also create folders for specific artifact types that will potentially be reused across components, such as Actors.
- Create a new folder to store your Getting Started artifacts. Name the folder using your first and last name (example: John Smith). To create a new folder, select the Getting Started project in the explorer panel, and then click the New button on the ribbon (Home tab, Artifacts group) and select Child Folder. Don't forget that you can often use the right-click context menu to perform tasks more conveniently.
-
Create the following folders within your folder:
- Actors: You will use this folder later on when you define actors for a use case.
- Login: You will use this folder to store all artifacts related to the Login component.
-
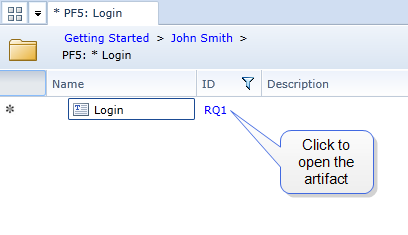
Select the Login folder. You can select a folder by clicking it in the explorer panel, or by clicking the ID link in the artifact list.

- Create two new textual requirement artifacts called Login and Minimum Password Requirements. To create a new textual requirement, click the New button on the ribbon (Home tab, Artifacts group) and then select Child Artifact>Textual Requirement.
- Open the Login textual requirement artifact. To open an artifact, click the artifact ID link in the artifact list.
-
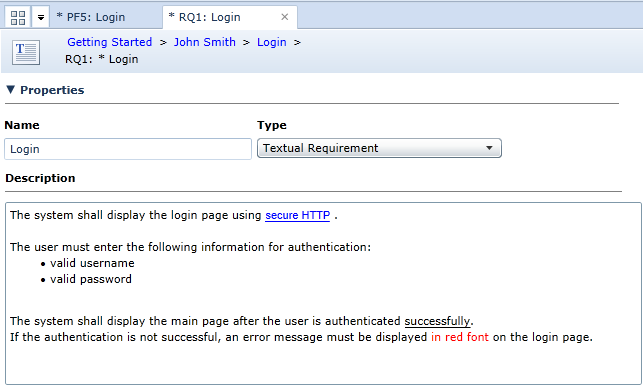
Provide a description of the login requirement and utilize rich text formatting to accentuate your key points:
- Change the font color and underline a key phrase.
- Add a bulleted list.
- Insert a hyperlink to a webpage on the Internet.
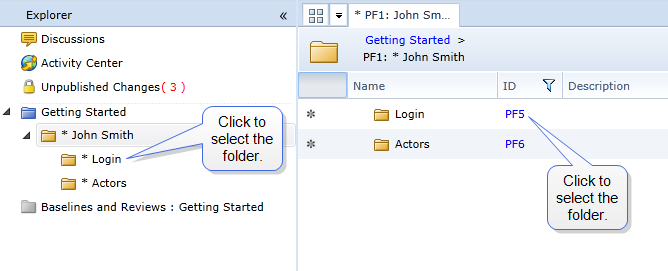
Your folder structure and textual requirement should look like this:
Now that you are finished creating some folders and textual requirements, continue to the next tutorial to learn how to save and publish your changes.
Saving, publishing, and discarding changes
All Blueprint requirements are stored on a central server, making it easy to collaborate with your team. Blueprint offers a unique feature that allows you to save a private draft of your changes to the server. These private drafts are not visible to other users until you publish your changes. Users always see the last published version after opening an artifact.
-
Click Save All to save a private draft of your changes. Notice that after you save your changes, the unsaved changes
icon no longer appears beside the artifact in the artifact list. The Save All feature is available on the application menu located on the ribbon. It is also available in the quick access toolbar  located in the top left corner.
 - Click Unpublished Changes in the explorer panel to view a list of all artifacts that contain unpublished changes. The number of unpublished changes are displayed in red font. Example:

- Click Publish All to publish your changes so the updated artifacts are available to other users. Notice that after you publish your changes, the lock indicator no longer appears beside the artifact in the artifact list.
The Publish All feature is available on the application menu menu located on the ribbon. It is also available in the quick access toolbar  located in the top left corner
 - Open the Login textual requirement and make a small modification. Notice that immediately after you begin modifying an artifact that is already published on the server, the artifact becomes locked. A lock indicator appears in the artifact list beside all artifacts with unpublished changes. Locked artifacts cannot be modified by other users. The lock is released after the changes are published or discarded, or until a privileged user steals the lock.
- Click Discard All to discard the changes and revert the artifact back to the last published version. Notice that the lock on the artifact is released.
- Close all tabs by right-clicking the left most tab and then select Close Other Tabs.
Browsing and searching in the Utility tab
Searching and browsing provides a fast and efficient way to locate artifacts in Blueprint. If you know where the artifact is located, you may prefer to browse to find the artifact. If you remember part of the artifact name, can't recall the location of the artifact, or need to view a list of artifacts that meet a certain criteria, take advantage of the Global Search feature.
Perform the following actions to become more familiar with searching and browsing in Blueprint:
- Open the browse tab in the utility panel.
-
Try expanding and collapsing folders to browse the artifacts in your project.
Note: Both artifacts and sub-artifacts are displayed in this view. After you have created some diagrams (in one of the later exercises), try browsing again and you will notice the sub-artifacts (example: diagram shapes) appear as children of the artifact.
-
Search for the Login artifact and then open the artifact. To open an artifact from the browse tab, right-click the artifact and select Open.
Note: The search feature in the utility panel searches the name and/or ID of the artifacts. To search all textual properties use Global Search.
Global Search
Blueprint allows you to perform searches in your current project, or across multiple open projects without having an artifact open in the main content area. The search field located above the ribbon in the upper right of the application allows you to search using a single piece of text or a text string. Using a wildcard [*]at the end of your term can increase your search results in any textual property for any Artifact & Sub-Artifact.??
![]()
??Sub-Artifact searches are restricted to Name, Label, and Description fields.
The Advanced Search follows similar rules to the Global Search, with the added functionality of the ability to search any user (excluding groups and imported users) property of an artifact across multiple projects. Advanced Search drills down into the Name, Label, and Description fields when searching through sub-artifacts to return even more results. It should be noted that each additional Property in the search is treated as an AND condition.
Example
Stakeholders have requested that the ???CSR??? position title be modified from ???Customer Service Representative??? to ???Customer Support Representative???. You complete an Advanced Search query to retrieve all Artifacts that contain the Name ???CSR???, as shown below:
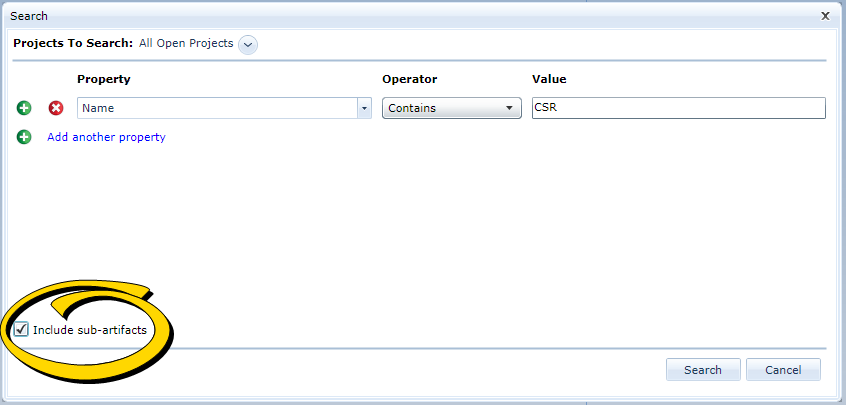
Note: We highly recommend that project administrators use custom properties to organize project and artifact data. In addition to enhancing project and content structure, custom properties can be searched and filtered efficiently.
To refine your search, Blueprint allows you to use operators as well as specify values.
Sharing artifacts
Blueprint offers a number of ways that you can point other users to specific artifacts in the system. Complete the steps below to learn how.
- Open the artifact that you want to share, or select it in the artifact list.
-
To share an artifact, click the Share button on the ribbon (Home tab, Artifacts group) and then click one of the following options:
- Via e-mail: a new email message is created with a link to the artifact.
- Copy to Clipboard: the artifact URL is copied to the Clipboard so you can share it using an application, such as e-mail or instant messaging.
Another popular way of sharing artifacts is to simply communicate the artifact ID. Other users can use the Go To feature to quickly access the artifact. The Go To button is located on the ribbon (Home tab, Editing group). You can omit the prefix of the artifact ID when you are using the Go To dialog to lookup an artifact.
Note: Artifact IDs are only unique within each instance of Blueprint.
Relationships
Blueprint allows you to capture relationships between artifacts using traces and other types of relationships. A trace is a type of relationship between two artifacts or sub-artifacts. Traces are used to establish and define the direction of a relationship. A relationship indicator ![]() appears beside artifacts that have associated traces. The relationship indicator
appears beside artifacts that have associated traces. The relationship indicator ![]() also appears beside sub-artifacts (example: shapes, connectors, and so on) in diagrams, if the sub-artifact contains at least one trace.
also appears beside sub-artifacts (example: shapes, connectors, and so on) in diagrams, if the sub-artifact contains at least one trace.
- Select the Login folder.
-
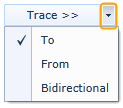
Create a birdirectional trace relationship between your Login and Minimum Password Requirements requirements. To create a bidirectional trace, select one of the artifacts and click the Manage Traces button on the ribbon (Home tab, Relationships group). Next, select the appropriate artifact in the list on the left, set the trace direction to Bidirectional using the Trace >> drop-down, and then click the Trace >> button. The Trace >> drop-down looks like this:
- Publish your changes.
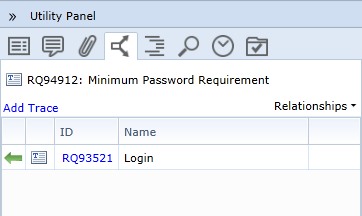
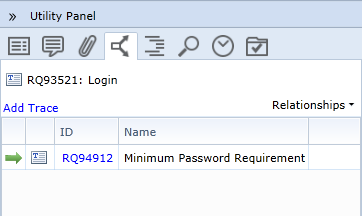
- Open the utility panel and view the traces you have created for an artifact. To view the traces associated with an artifact, select the artifact and open the Relationships tab in the utility panel.
- Navigate from an open artifact to one of its traced artifacts. To do this, simply click the ID of a traced artifact on the Relationships tab in the utility panel.
After you have completed the tutorial steps, the Relationship tab for the Minimum Password Requirement and Login textual requirements should look like this:
Discussions and Social Collaboration
Blueprint encourages collaboration on requirements through the use of commenting. You can add comments to all artifacts and sub-artifacts. You can also generate discussion by replying to the comments added by other users. In the Indicators column of the artifact list, a discussion indicator ![]() appears beside artifacts that contain open discussions. The discussion indicator
appears beside artifacts that contain open discussions. The discussion indicator ![]() also appears beside sub-artifacts (example: use case steps, shapes, connectors), if the sub-artifact contains open discussions.
also appears beside sub-artifacts (example: use case steps, shapes, connectors), if the sub-artifact contains open discussions.
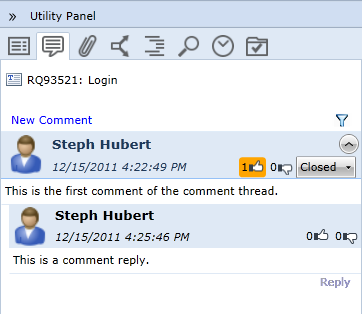
- Open the Login textual requirement.
- Check if there are any comments on the artifact. To view the comments associated with the artifact, open the Discussions
 tab in the utility panel.
 - Add a new comment to the artifact. Click the New Comment link and type your comment into the field.
- Click the Publish link located at the button of the comment to make your comment visible to other users.
- Click the agree or disagree
 buttons to express your opinion about the comment.
 - Add a reply to an existing comment. To add a reply, click the Reply link located under an existing comment.
- Change the discussion status to Closed to indicate that the comments have been addressed. The discussion status drop-down is located on the right of the discussion header.
- Publish your changes.
After you have completed the above exercise, the Discussions tab in the utility panel looks like this:
Activity Center
The activity center is a powerful feature that keeps you up-to-date about artifacts that you care about. It also provides easy access to all reviews in which you are a participant.
To access your activity center, click the Activity Center option located in the Explorer panel. Your activity center does not display updates until you have started following artifacts. You can begin following an artifact by selecting it in the artifact list and then clicking the Follow button on the ribbon (Home tab, Artifacts group). After you have started following an artifact, items will appear in your Activity Center after activities (involving that artifact) have occurred.
Discussion Explorer
The discussion explorer provides you with the ability to explore all comments in a project. A variety of filters are available, allowing you to find specific comments more easily.
To access the discussion explorer, click the Discussions option located in the Explorer panel. You can click the filter ![]() button to display the search filters. The filters allow you to control which comments are displayed on the screen. You can filter comments by user, status, or date.
button to display the search filters. The filters allow you to control which comments are displayed on the screen. You can filter comments by user, status, or date.
Actors and use cases
A use case describes an interaction between an actor and the system that yields an ???observable result of value??? to the actor.An actor can be any person, role, organization, application, system, and so on, that interacts with the system being modeled.
Prior to defining a use case, it is a good idea to define your actors.
- Select the Actors folder and create two new actor artifacts called Employee and Customer.
- Provide a description for the actors and set a custom icon for the Employee actor. To set a custom icon, click the Edit link located below the picture.
- Publish your changes.
- Create two more actors, Manager and Part-Time, and indicate that they are both types of employees. To do this, change the Inherits From property on each actor to Employee.
- Publish your changes.
Now that you have created your actors, complete the following steps to define a use case:
- Select the Login folder and create a new use case artifact called Login.
-
Define the main flow for the login use case, showing the customer entering the correct login credentials:
- Assign actors to each of the use case steps. To associate an actor with a use case step, select a step and click the Set Actor button on the ribbon (Use Case tab, Step group).
-
Set the use case pre-conditions and post-conditions.
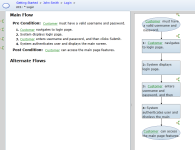
The main flow steps with associated actors looks like this:
- Update the use case to include the alternate flow that occurs when a customer enters incorrect credentials:
Create the alternate flow. To create an alternate flow, select the step where you want the alternate flow to begin, and then click the Add Alternate Flow button on the ribbon (Use Case tab, Flow group) and then select Internal.
Note: An internal alternate flow is an alternate flow defined within a use case. An external alternate flow is an alternate flow that is included from an separate use case.
- Define the steps in the alternate flow.
- Configure the flow to return to the correct position in the main flow. To set the start and return steps of the alternate flow, select the alternate flow and click the Set Start/Return Steps button on the ribbon (Use Case tab, Flow group).
- Publish the use case.

When your use case is complete, it looks like this:
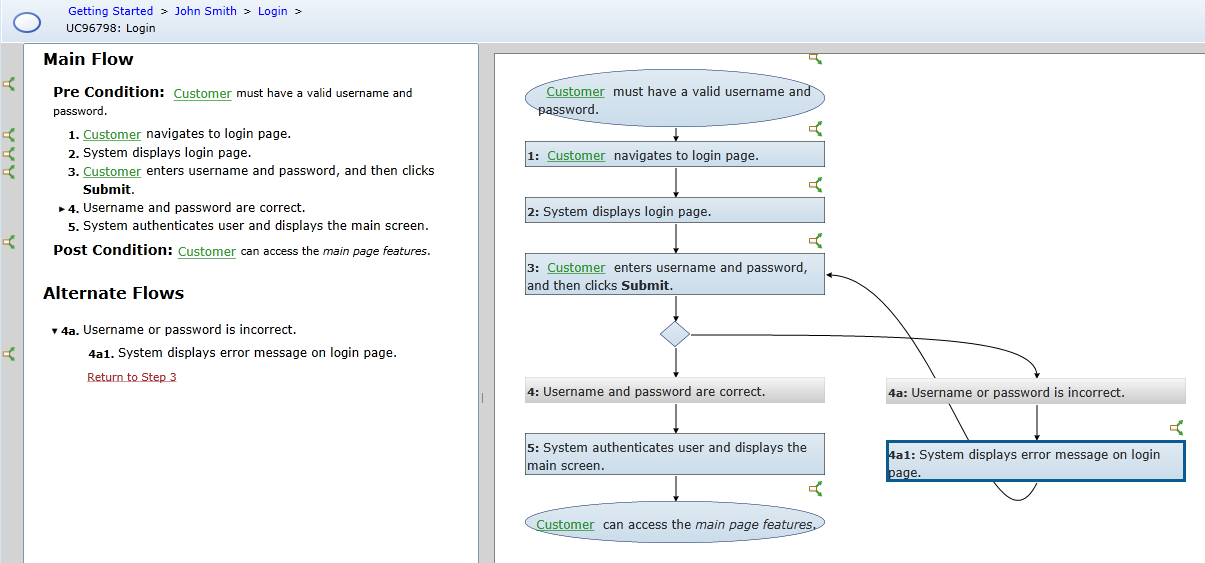
You can view the entire step text in the workflow because the Full Text option is enabled on the ribbon (View tab, Use Cases group). The Curved Lines option is also enabled.
UI Mockups
A UI Mockup is a prototype of a user interface in the system. UI mockups are effective on a standalone basis, but are even more powerful when they are viewed in simulations. After you associate UI mockups with your use case steps, Blueprint can provide a richer simulation experience that better demonstrates the interaction between the user and the system.
Perform the following steps to create UI mockups for the login screen and the login error screen:
- Select the Login folder.
- Create two new UI mockup artifacts called Login Screen and Login Screen Authentication Error.
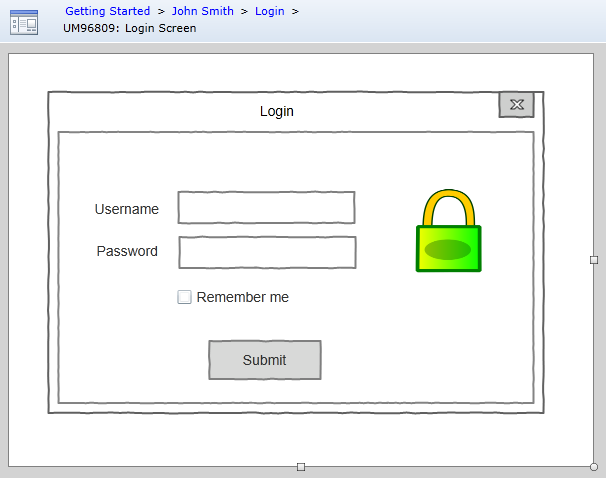
- Open the Login Screen UI Mockup and build a simple login dialog:
- Add a dialog using a window widget, and configure the title bar to display a title and a close button. You can set the title by double-clicking the window. To remove the minimize and maximize buttons, select the window widget, open the Properties tab in the utility panel, and set Show Button to Close Only.
- Add a text field for username and password, and label them appropriately. To create a password field, add a regular text box and then select hide input.
- Add one or more buttons to the window dialog.
- Add an image to the dialog.
- Add a remember me check box to the dialog.
- Resize the canvas so it fits the dialog more appropriately.
Here's an example of a Login Screen UI mockup:

-
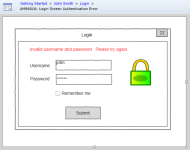
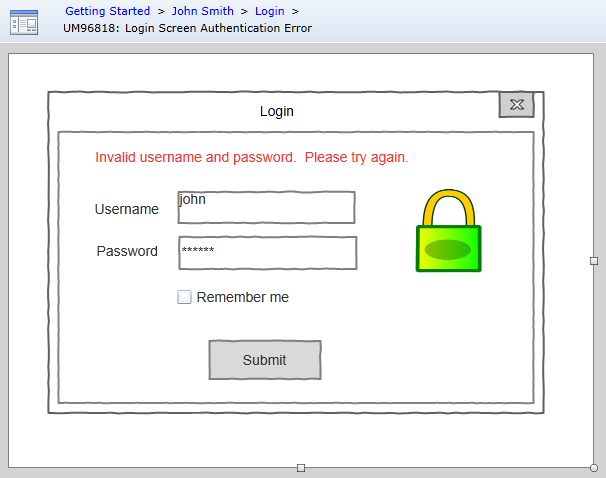
Open the Login Screen Authentication Error UI mockup and create a new UI mockup for the error case:
- Copy and paste all of the widgets from the Login Screen UI mockup to the Login Screen Authentication Error UI mockup.
- Add an error message to the new UI mockup using red text.
Here's an example of a Login Screen Authentication Error UI mockup:
- Publish your changes.
Associating UI mockups with use case steps
Now that you have created UI mockups, you can associate your UI mockups with steps in your use case.
- Open the Login use case.
- Associate the Login Screen and Login Screen Authentication Error UI mockups with the appropriate use case steps. To set a UI mockup, select one or more use case steps and then click the Set UI Mockup button on the ribbon (Use Cases tab, Step group).
- Publish your changes.
After you have set your UI mockups, the use case looks like this: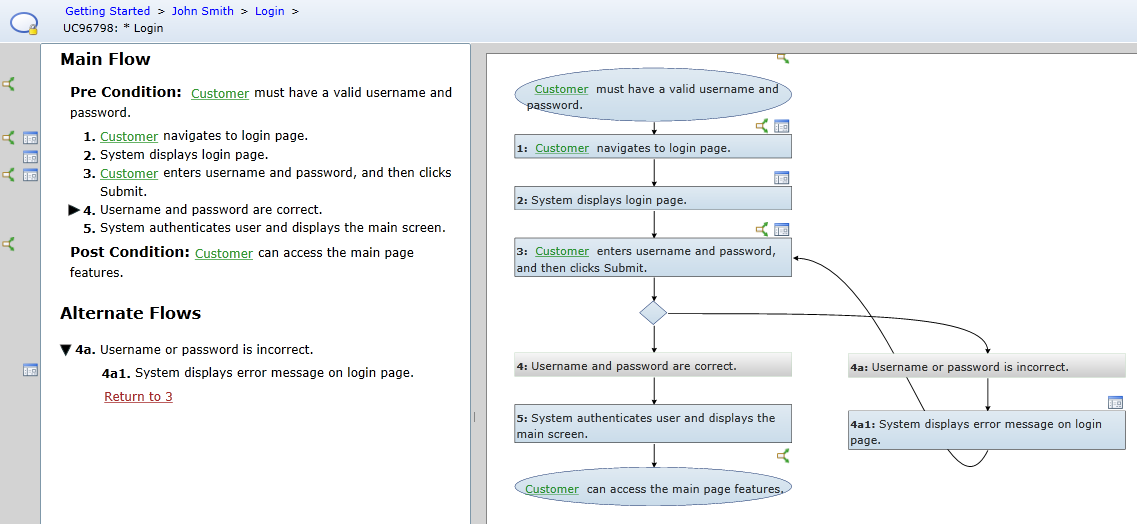
You have now created a use case and associated UI mockups with your use case steps. Refer to the simulations tutorial if you are interested in learning how to run a rich simulation of your use case.
Simulations
Now that you have created a use case and set the UI mockups, you can run a rich simulation of the use case.
- Open the Login use case.
- Start a simulation by clicking the Simulate button on the ribbon (Use Cases tab, far right).
- Walk through each step of the simulation.
- Try the following actions:
- Restart the simulation at the beginning of the use case. To restart the simulation, click Clear Simulation History in the simulation ribbon (Home tab, Settings group).
- Use the utility panel to view the traces, comments and attachments associated with a step.
- Add a comment to a shape in a UI mockup. To do this, simply select the shape and then click the New Comment link on the Discussions tab in the utility panel.
- Close the simulation.