
Importing new requirements from Microsoft Excel
Blueprint provides you with the ability to import requirements from a Microsoft Excel spreadsheet. In other words, you can create your requirements in Microsoft Excel and then import them into Blueprint.
Note: You cannot undo an import from Excel. You can, however, delete the imported requirements.
Blueprint provides the following features to make importing requirements easier:
- The Excel spreadsheet can include hierarchical specifications for each requirement, if desired.
- Blueprint allows you to select the project and the folder or parent requirement under which you want to import the requirements.
Note: Although you can drag and drop requirements to adjust the hierarchy after the import is complete, hierarchy declarations in the Excel spreadsheet and parent-folder selection allow you to optimize the import process, minimizing load in Blueprint.
- A list of any mismatches, between the Excel spreadsheet and the Blueprint project, in terms of Artifact Types, Properties, or Valid Values. The list identifies the column/row in the spreadsheet so you can fix the error prior to importing.
- A preview of the requirements is displayed prior to performing the actual import operation.
Tip: To better visualize where the requirements will be imported, we recommend that you turn off Wrap Text (View tab, Artifact List group) option on the ribbon, and select the folder or parent requirement under which you want the new requirements to be imported.
Sample Import Spreadsheets
For your convenience, take a look at the following examples:
-
Requirements Import Template: Provides a basic template with only system properties. This template will work with all Blueprint projects.
-
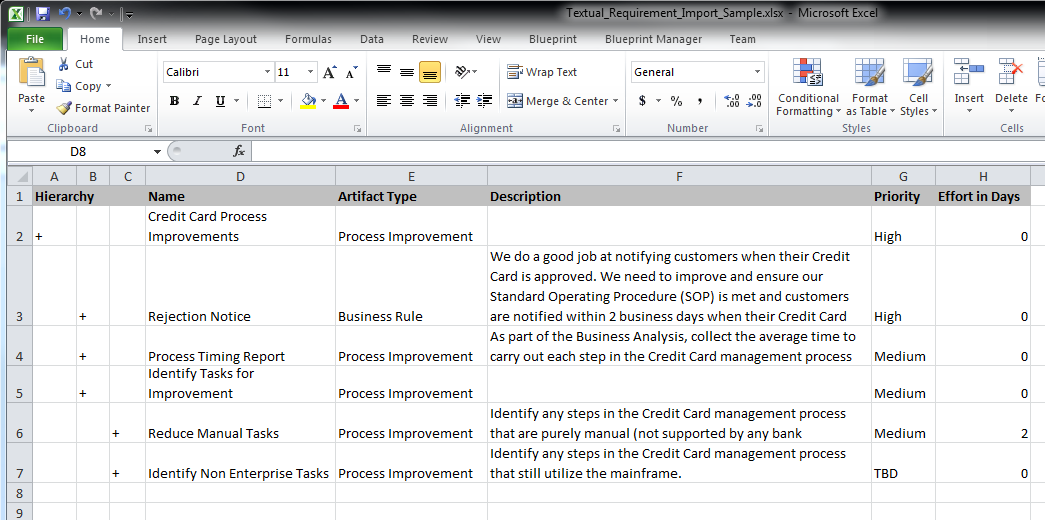
Sample Requirements Import: Provides an example with hierarchy columns, custom artifact types, and custom properties. Here are a few important details to keep in mind while you are looking at this template:
-
The Hierarchy column (and blank columns to the right of it) are optional: depending on where + symbol is, the artifacts will be made children
-
In this template, the values in the Artifact Type column are custom artifact types. This template will not work unless the project contains Artifact Types called Business Rule and Business Requirement.
-
Additional columns (example: Priority, Effort in Days) are custom properties and must exactly match the name of the custom property in your project.
-
Excel Spreadsheet Format
Each new requirement that you want to import must appear as a new row in the spreadsheet. The Excel spreadsheet looks like this:
The following columns can be included in the Excel spreadsheet:
| Spreadsheet Column Name | Description | Required or Optional | Valid Values |
|---|---|---|---|
| Hierarchy | You can use Hierarchy columns to specify the relative outline level at which each Textual Requirement will be imported. When no Hierarchy is specified, all requirements are imported at the same hierarchy level. | Optional | The plus sign, + , must appear in the appropriate column depending on the desired hierarchy. |
| Name | Defines the name of the requirement. | Required | Specify the text that you want to import as the name of the new requirement. |
| Artifact Type | Defines the artifact type. | Required | This value must be an artifact type that exists in the project to which you are importing. In other words, requirements are only imported when matching artifact types have been configured by the project admin in the Blueprint project. |
| Description | Defines the description of the requirement. | Optional |
Specify the text that you want to import as the description of the requirement. |
| Custom Artifact Properties (example: Priority, Owner) | Allows you to import values for custom properties in your project. | Optional | Other Excel columns, such as Priority or Effort in Days, will only be imported when matching Properties and Valid Values have been configured by the Project Admin in the Blueprint project. |
To import new requirements from Microsoft Excel:
-
Create your import spreadsheet using Microsoft Excel. Save the document in the .xlsx file format.
-
In Blueprint, click the Artifacts button on the ribbon (Import/Export tab, Import group).
-
Select the project to which you want to import the requirements. Click Next.
-
Select the folder or parent requirement under which you want to import the requirements. Click Next.
-
Click the
 button and locate the .xlsx file that contains your requirements.
After selecting a file, a list of any mismatches between the Excel spreadsheet and the Blueprint project (in terms of artifact types, properties, or valid values) is displayed.
You must correct all validation errors before you can import the requirements. To assist you, the list identifies the column and row in the spreadsheet where an issue exists. As you make changes to the Excel file, you can click the Validate button at any time to revalidate the import data.
When the data is validated without any errors, you will be able to click Next.
-
Review the import summary to verify that the requirements will be added to the project as expected.
-
If desired, select the Automatically publish imported artifacts check box, then click Next.
Note: Leaving these artifacts unpublished gives you another opportunity to review the artifact import for issues.
The import job is placed in the Job Management queue, which can be viewed in the Job Management window (Menu button, Manage, Jobs).
-
Close the dialog.
When the import job has completed, a confirmation dialog will appear asking you if you would like to refresh your project to display the new artifacts.
After the requirements have been imported, if you did not select the Automatically publish imported artifacts check box, the artifacts with be unpublished and unsaved. You must publish them before other users can view them. You can discard the changes if you notice a problem with the import.
Tip: You can also update your requirements artifacts using Excel. For more information about using Excel to update artifacts, see Updating artifacts using Excel.