Configuring a review
To configure a review, perform the following steps:
-
 Provide a name for the review artifact.
Type a name into the Name field.
Tip: We recommend that you choose a name that is descriptive, but relatively short in length.
-
 Set the review end date.
- Click the calendar
 button and select the date. Or, type the date into the field in the following format: MM/DD/YYYY (example: 11/14/2011).
Note: The review is automatically closed when the End Date is reached. A follow-up review can be used to allow participants to review the same set of artifacts.
-
 Set the review contents.
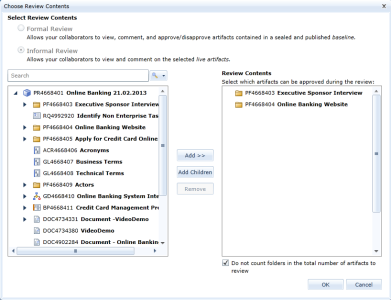
- Click the Select Contents and Approval Button. The Choose review contents dialog appears.
-
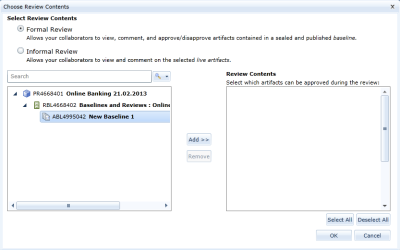
Select Formal Review or Informal Review. Formal reviews allow your collaborators to view, comment, and approve/disapprove artifacts in a sealed and published baseline. Informal reviews allow your collaborators to view and comment on live artifacts in the review.
Note: You must select your desired option prior to selecting the review contents. If you change this option after review contents have been selected, you will receive a warning and you must discard the selected review contents prior to continuing.
-
Search or browse to select the artifacts that you want to include in the review, and then move them to the right side of the dialog underReview Contents.
Tip: To select all child artifacts in a folder, select the folder and then click Add Children.
Note:If theDo not count folders in the total number of artifacts to reviewcheck box is selected, folders are not counted as artifacts in the review. The total number of viewed artifacts is displayed in View Overviewand theReviewers Experience.
-
If you have selected a Formal Review, place a checkmark beside all the artifacts that you are seeking approval.
Tip: To select all artifacts in a folder, select the folder and then click Select All.
Note: Artifacts that appear on the right side of the dialog without a checkmark can be reviewed, but not approved.
- Click OK to save the review contents.
-
 Set the reviewers:
- Click the Select Review Participants button.
- Place a checkmark beside the appropriate individuals.
- Click OK to save the review participants.
-
If desired, you can Require electronic signatures for formal reviews.
If it has been enabled, you can also Require meaning of signature to implement an additional level of security.
-
If you have selected a Formal Review, select which Review Participants will have the Approver role in the Permissions column.
If meaning-of-signature definitions have been enabled, and the user has multiple project roles, you can also select the roles that will be presented to the user when they are electronically signing their approval or disapproval of an artifact.
-
 Provide a description for the review.
-
Type a description into the Description field.
The description can be used for any purpose, but it is typically used to provide information about the purpose of the artifact.
-
 Start the review.
Choose one of the following options for starting the review:
- Click the Start Review button in the main content area when the review artifact is open.
- Click the Start button located on the ribbon (Baselines and Reviews tab, Review group).
Note: The Start Review button cannot be selected until there is at least one artifact added to the review contents.
After you start the review, the Status changes to Active, and review participants are sent an email notification about the pending review request.
Note: Review artifacts are automatically published after you change the status of the review.
Modifying an Active Review
When any review is active, you can still modify the list of review participants. Your ability to change other review parameters differs depending on whether you are modifying an Informal Review (live artifacts) or a Formal Review (baseline artifacts). The differences are:
- When an informal review is active, you can modify the review participants and change the review contents, but you cannot change the review to include baseline contents.
- When a formal review is active, you can modify the review participants and their approval permissions. You can also modify which artifacts are candidates for approval. You cannot, however, change the review content to include a different baseline.
Learn More
Adding a review
Viewing review status information
Closing a review
Creating a follow up review
Deleting a review


