Associating custom properties with sub-artifacts
Overview
Blueprint allows project administrators with the correct privileges to associate custom properties with sub-artifacts (such as shapes, connectors, glossary terms, and so on). This allows you to associate various types of data with sub-artifacts in the system. You can also control the order in which the properties are displayed so it is easier to view the information in the utility panel.
Example
Fred manages the glossary artifacts in Blueprint. The company has started developing the next version of the product, and some of the terms are no longer applicable.
Fred decides to create a custom property called Version and associate the custom property with the Glossary Term sub-artifact type.
Now, Fred can set the version on each artifact type so there is no confusion about whether or not the term is applicable to the new product.
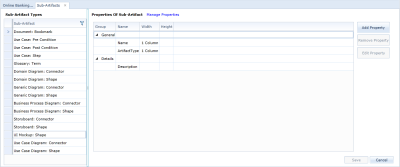
Custom properties are added to sub-artifacts on the Sub Artifacts tab in the Project Administration Console. The Sub Artifacts tab looks like this:
Note: Blueprint consists of a predefined set of sub-artifact types. You cannot create custom sub-artifact types.
Tasks
Adding a custom property to a sub-artifact
Removing a custom property from a sub-artifact
Adding a custom property to a sub-artifact
You can add any custom property to any of the predefined sub-artifacts in Blueprint.
To add a custom property to a sub-artifact:
-
Place a checkmark beside the custom properties that you want to associate with the sub artifact.
Tip: You can control the order in which the custom properties are displayed in the main experience by selecting a property and clicking the Up and Down buttons.
You can click the Manage Properties link to add or manage custom properties.
- Click Save.
Removing a custom property from a sub-artifact
Warning: Removing a custom property from a sub-artifact results in data loss! If you remove a custom property from a sub-artifact, all data stored for that particular custom property is lost.
To remove a custom property from a sub-artifact:
- Remove the checkmark beside the custom properties that you no longer want to associate with the sub artifact.
- Click Save.

