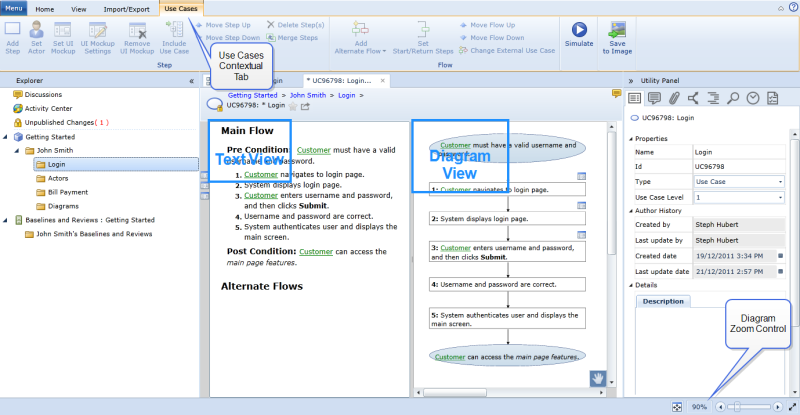
About the use case editor layout
The use case editor layout allows you to create use cases in either text view, workflow view, or split view (both text view and workflow view). Try out the different views and choose which ones works best for you. Various customizations are available for each view.
The use case editor looks like this:
Use Cases Group on the Ribbon View Tab
There are a number of features on the View tab of the ribbon that allow you to customize the layout of the use case editor, as well as customize the look and feel of the diagram. The Use Cases group on the View tab looks like this:
![]()
The view and customization options include:
- Views: Allows you to select your desired view while working with a use case artifact.
The view options are:Split: Displays both the text view and the workflow view in the main content area.
Text: Displays the text view only, without the workflow view.
Workflow: Displays the workflow view only, without the text view.
Tip: To make more space available to view your artifact(s), you can collapse both the utility panel and the explorer panel by clicking the full screen button
 (the lower rightmost corner of the window).
- Full Text: Displays the text of each use case step on a single line. This layout utilizes vertical space more efficiently, allowing you to view more use case steps in the main content area without scrolling.
- Alternate Layout: Displays the diagram in a way that uses less vertical space, at the expense of more overlapping connectors.
- Curved Lines: Displays the use case connectors using a curved line style. Curved lines are helpful if the use case has a number of alternative flows where the entrance and exit connectors overlap with other flow connectors. By switching to a curved line, the connector overlap is reduced.
-
Expand All: Allows you to expand the alternate flows in workflow view. If you click Expand All, the alternate flows are displayed in full detail in the diagram.
Note: You can also use the expand buttons in workflow view
 and text view
 .
. -
Collapse All: Allows you to collapse the alternate flows in workflow view. If you click Collapse All, the alternate flows are collapsed.
Note: You can also use the collapse buttons in workflow view
 and text view
 .
.
Use Cases Ribbon Tab
When the use case editor is open, a Use Cases tab appears on the ribbon, providing you with various editing features. The Use Cases tab looks like this:
Step group:
- Add Step: Adds a new step to the use case, directly below the selected step.
- Set Actor: Associates an actor with the selected use case step, pre condition, or post condition.
- Set UI Mockup: Associates a UI mockup with the selected use case step(s).
-
Remove UI Mockup: Removes a UI mockup from the associated use case step(s).
- Include Use Case: Associates a use case with the selected use case step. Including a use case in a step can be beneficial when a step is high level and you want to link the step to another use case that demonstrates the lower level steps that are required to complete that particular step. It also provides a way to reuse common functions across multiple use cases.
- Move Step Up: Moves the selected step(s) up one position in the use case.
- Move Step Down: Moves the selected step(s) down one position in the use case.
- Delete Step(s): Deletes the selected step(s).
- Merge Steps: Merges two or more selected use cases into a single use case step.
Flow group:
- Add Alternate Flow: Allows you to add an internal or external alternate flow.
- Add Internal Flow: Adds an internal alternate flow to the use case. An internal alternate flow is an alternate flow defined within a use case.
- Add External Flow: Adds an external alternate flow to the use case. An external alternate flow is an alternate flow that is included from an separate use case.
- Set Start/Return Steps: Allows you to set the start and return steps for an alternate flow.
- Move Flow Up: Moves the selected alternate flow up one position in the use case.
- Move Flow Down: Moves the selected alternate flow down one position in the use case.
- Change External Use Case: Changes the use case artifact of an external alternate flow to another use case artifact.
Simulate: Starts a simulation from the beginning of the use case.


