Adding Tags with the Data Bin
To begin tagging we will introduce you to the most basic tagging tool the “Data Bin”.
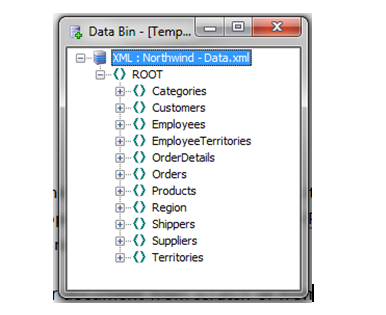
After placing your data into Datasources, you can select Data Bin which is located under the Blueprint tab. For the purpose of this tutorial we will be using the Northwind data as used in previous examples. Once Data Bin is selected the following window will appear. Nodes and sub nodes of data are organized neatly for easy retrieval. Data Bin was designed for simplicity, so to create a table of data using the Data Bin, simple select a category, for instance Employees and drag it on to your document.
The following table will appear:
-
The column titles reflect the data that will be displayed in the columns when we run the report
-
Items surrounded by brackets ([ ]) indicate tags.
Note: This is the default appearance of tags. You can change this by using what is called a nickname, and we discuss that elsewhere in this guide. When you run the report, the software knows to present the text as text but to treat tags as placeholders for data.
-
The tag appears because you dragged a data group onto the template, indicating that when generated, the report should run through each listing in that group.
-
The tags occur when data subgroups are inserted into a report. AutoTag knows that each time this tag is called upon, it should display the associated value in the data source
|
EmployeeID |
LastName |
FirstName |
Title |
TitleOfCourtesy |
BirthDate |
HireDate |
Address |
City |
Region |
PostalCode |
Country |
|
[Employees][EmployeeID] |
[LastName] |
[FirstName] |
[Title] |
[TitleOfCourtesy] |
[BirthDate] |
[HireDate] |
[Address] |
[City] |
[Region] |
[PostalCode] |
[Country] |
:forEach>
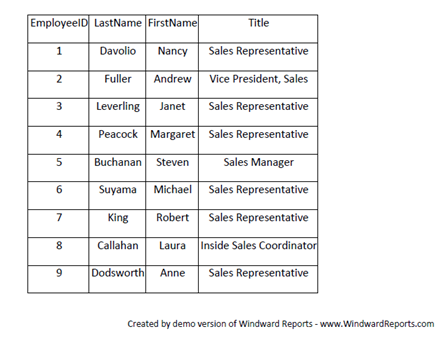
For example, we only want to incorporate Employee ID, First Name, Last Name, and Job Title for our final table.
|
EmployeeID |
LastName |
FirstName |
Title |
|
[Employees][EmployeeID] |
[LastName] |
[FirstName] |
[Title] |
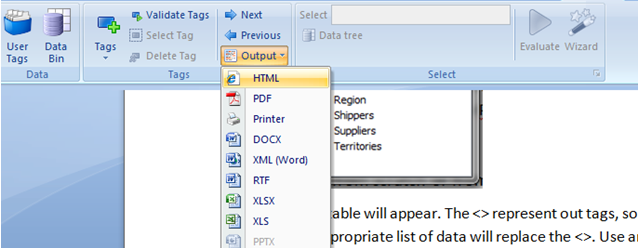
Save the Document and select what format you would like your final report to be in.
For instance by selecting PDF the document will turn out like below, a full list of all the employee ID, Last Name, First Name, and Job Title.