
The XPath Wizard
The XPath Wizard makes it easy to select a subset of data in an XML data source. For example, instead of creating a table of all the employees in a company, you could use the wizard to create a table of sales reps only.
This brief article will introduce you to the wizard. For a detailed how-to example that uses the wizard, please see our tutorials on If Tags and Else Tags.
Tip: To learn more about XPath, please refer to W3Schools XPath tutorial at http://www.w3schools.com/xpath/default.asp.
The XPath Wizard Interface
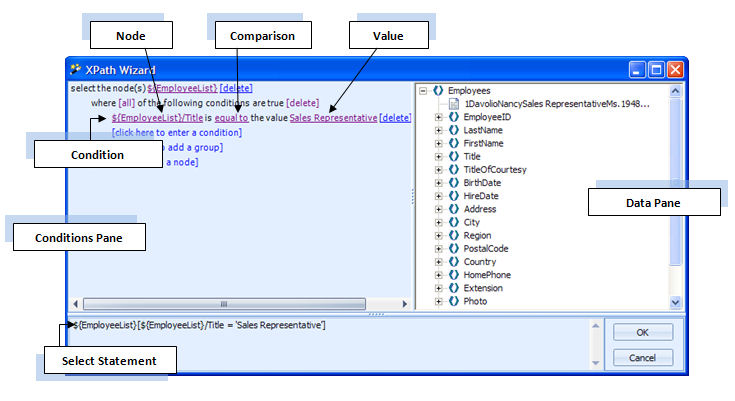
The wizard is composed of three panes: the Conditions pane, the Data pane, and the Select Statement pane.
The Conditions pane is where you create the conditions that will be applied to the data. A condition is made up of a node, a comparison, and a value. You can see those three elements labeled in the diagram above.
- The node (or subnode) is the data upon which you want to create a condition. In this example's data source, the node contains the employees' titles.
- The comparison is a drop-down list whose options are equal to, not equal to, greater than, greater than or equal to, less than, less than or equal to, contains, and starts with. In this example, we chose the comparison "equal to."
- The value is what the data in the node will be compared to. In this example, we chose the value "Sales Representative."
The Data pane is what you see when you have created a condition. It shows what data will appear when you run a report, and in that way it is similar to the Evaluate pane in the Tag Editor. (Tip: Keep in mind that when the condition sits in a forEach loop, you will see only the first item in the data source and not the entire group of items.)
The Select Statement pane shows, appropriately enough, the select statement created by the condition. When you click OK to close the wizard, this is the text you will see in the select bar of the Tag Editor.
You may create multiple conditions within the wizard. If you do so, the wizard gives you the option of determining whether all or any of the conditions must be met.
One last note – the wizard is called the XPath Wizard instead of the XML Wizard because XPath is a language (syntax) used for finding information in an XML file.