
Getting Started with Blueprint Advanced Features
Overview
This document provides a walk-through of additional Blueprint features and capabilities that were not covered in the basic Getting Started Guide. This guide is a continuation of the basic Getting Started Guide. You must first complete the basic
Tips, Tricks and Advanced Features
Documents and attachments
You can use documents, images and other file types to enhance your requirements. Blueprint allows you to add attachments to any artifact or sub-artifact (example: shapes, connectors, and so on). In addition to attachments, you can also create document artifacts. Document artifacts can be referenced from one or more artifacts in the system, while file attachments are associated with a single artifact.
- Create a new document artifact called Terms and Conditions.
-
Open the artifact and upload a Word document that you want to reference from multiple artifacts. To upload a document, click the Attach a file link in the document editor to upload the file.
Note: Document artifacts can be referenced from one or more artifacts in the system, while file attachments are associated with a single artifact.
- Open the Login textual requirement.
- Add the terms and conditions document as a document reference. To perform this task , open the Files tab in the utility panel, and then click Add>Document Reference. Next, locate the Terms and Conditions artifact and click OK.
- Attach an image file to the Login textual requirement. To add a file attachment, open the Files tab in the utility panel, and then click New>Add > Attachment.
- Publish the artifact.
- Open the image file and/or the referenced document. To open a file attachment or referenced document, right-click the file or document reference on the Files tab in the utility panel, and select Open.
Viewing artifact history
Blueprint records every change that is published to the server and allows you to view historical versions as well as differences between two versions.
- Open the Login textual requirement.
- Add some text to the description of the artifact.
- Publish your changes.
- Rename the Login textual requirement to Login Page and Authentication.
- Publish your changes.
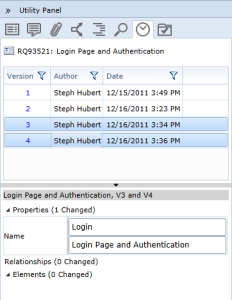
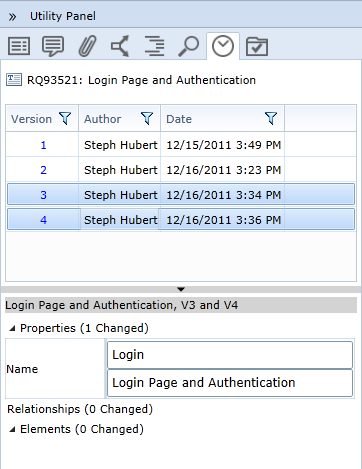
- View the history of all changes made to the artifact. To view the history, simply open the History tab in the utility panel.
- Click a version to view it in the main content area. The utility panel displays a summary of the changes made in the selected version.
- View the differences between two version of the artifact. To view the changes between two versions, hold down the Ctrl key and click two rows in the table. The changes are displayed in the panel below the version list. Here's an example that displays the changes between version 3 and 4, where the name of the artifact was modified:
- View the initial version of the artifact. To do this, simply click the 1 hyperlink that appears in the Version column. The historical version of the artifact opens in the main content area. The header in the main content area displays the version number that you are viewing:

Diagrams
Blueprint allows you to create business process diagrams, domain diagrams, and generic diagrams. Generic diagrams offer a diverse set of shapes that you can use to create a variety of diagrams. All of the diagram editors in Blueprint are very similar. You have already created UI mockups in a previous exercise, so you will probably find the tutorials below fairly straightforward.
Creating a business process diagram
Let's start by creating a simple business process diagram for online bill payments:
- Create a new folder called Bill Payment.
- Select the Bill Payment folder and create a new business process diagram artifact called Bill Payment Process.
- Add swim lanes for the customer, the online banking website, and the online banking transaction system. Consider placing these lanes into multiple pools.
- Build a simple flow to represent a customer paying a bill:
- Start the flow with the customer logging in, and create tasks in each of the swim lanes to complete the bill payment flow.
- Include at least one gateway
- Add an annotation to the diagram
- Add a trace from the logging in task to the Login Page and Authentication artifact. To add a trace to or from a shape in a diagram, click the shape and then click the Add Trace link on the Relationships tab in the utility panel.
- Try out some of the more advanced features:
- Change the connectors between the website and the customer to be message flows. To do this, simply right-click the connector and select Message Flow.
- Set a task to loop. To set a task to loop, right-click the task and select Loop > Standard.
- Publish your changes.
Here's an example of a business process diagram: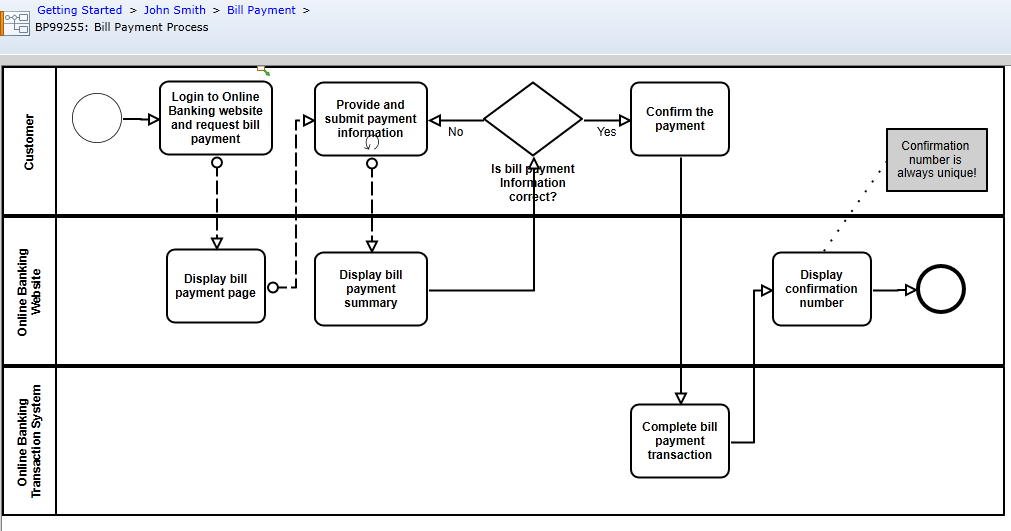
Creating a domain diagram
Now let's create a domain diagram that demonstrates some of the online banking entities:
- Create a new folder called Diagrams.
- Create a new domain diagram called Online Banking Entities.
- Open the Online Banking Entities artifact, and create a high level domain diagram representing the entities in Online Banking:
- Add some entities (example: Customer, Account, Bill Payee).
- Draw relationships between the entities.
- Add some elements to the entities in the diagram (example: Name, Email, Password, and Address for the Customer entity). To add an element, drag the element shape from the palette onto an entity.
- Add arrows to the connectors to indicate directionality of the relationship. To add arrows to the connectors, right-click the connector and select Customize Connector > Target Type.
- Label the connectors to indicate cardinality of the relationships. To set the start or end label, point to the start or end point. When the light grey box
 icon appears , click the box and enter your text.
Here's an example of a domain diagram: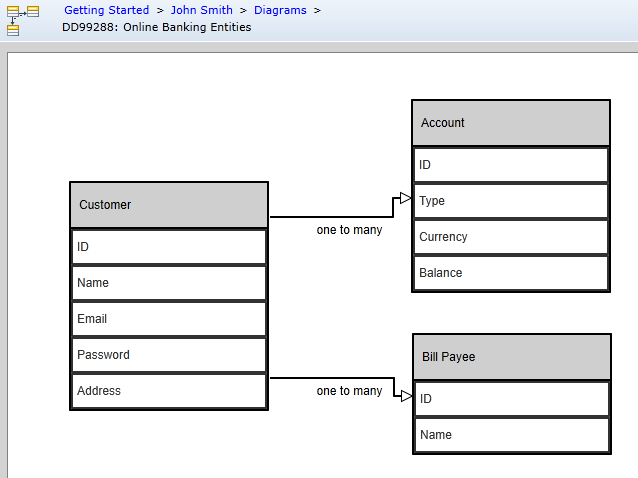
Creating a generic diagram
Finally, let's use a generic diagram artifact to create a basic state diagram:
- Select the Diagrams folder and create a new generic diagram artifact called User States.
- Open the User States artifact and build a basic state diagram for a customer in the Online Banking system:
- Add shapes representing various user states (example: Registered, Activated, Disabled, and Deleted). You can add shapes by dragging them from the palette to the canvas.
- Add arrows representing state transitions. You can drag connectors onto the canvas in the same way that you drag shapes onto the canvas. Or, you can hover over the source shape and drag from one of the red ports on one shape to another shape.
- Style your diagram:
- Align the shapes in your diagram so they are evenly distributed. To align shapes quickly, use the Align drop-down located on the ribbon (Generic Diagram tab, Arrange group).
- Set the fill color and line color on some of the shapes. The fill and line controls are available on the ribbon (Generic Diagram tab, Drawing group).
- Set the text color in some of the shapes. To set the text color, double-click the shape to enter text edit mode. Then, select all the text and apply a text color using the color control on the ribbon (Home tab, Font group).
- Customize the connectors:
- Change the direction of a connector. Simply right-click the connector and select Customize Connection > Swap Direction.
- Experiment with different arrowheads and connector types. To change the arrowhead, right-click the connector, select Customize Connection, and then change the Source Type or Target Type. To change the connector type, right-click the connector, select Customize Connection, and then change the Connection Type.
- Publish your diagram.
Here's an example of a generic diagram: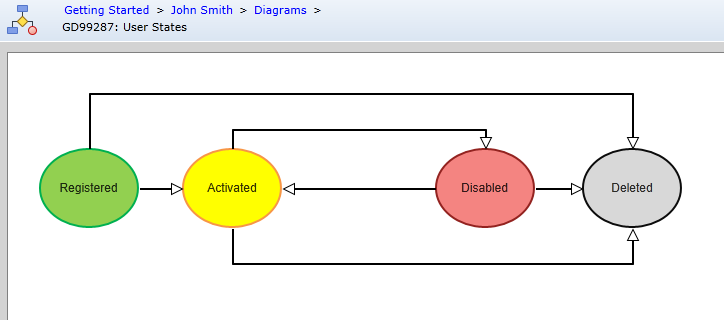
Trace analysis
Blueprint offers a number of tools to help you view and analyze the traces in your project. Trace coverage analysis generally involves verifying that all requirements of a particular type are associated (traced to) artifacts of another type. For instance, your organization may have a policy stating that all functional requirements must be associated with a business requirement. In this case, you can use Blueprint to ensure that every requirement is driven by a business need or provides business value.
- Perform a coverage analysis of the relationships between the artifacts in your project:
Open the traceability explorer by clicking the Open Traceability Explorer button on the ribbon (Home tab, Relationships group). The Matrix Scope Selection dialog appears.
Select an artifact or folder on the left and right side of the dialog to include those artifacts (and their children) in the traceability matrix.
Click OK to generate the matrix.
View the report. It shows which traces exist and which artifacts are not covered.
Note: Artifacts that are not covered are called orphaned and are displayed in red font.
Filter folders out of the view. Simply click the Artifact Type drop-down on the ribbon (Traceability Explorer tab, Row Filters group) and then uncheck the Folder option.
Impact Analysis
Impact Analysis illustrates the effect of change exerted by an Artifact on its related Artifacts. This allows for an understanding of the full impact of change, and the ability to estimate time and resources more accurately. Any artifact can be used as the starting point of impact analysis.
To initiate Impact Analysis
Navigate to an Artifact in your project that has a relationship indicator 
Click the Impact Analysis icon in the Relationships group on the ribbon 
The Impact Analysis module will open in a new browser tab
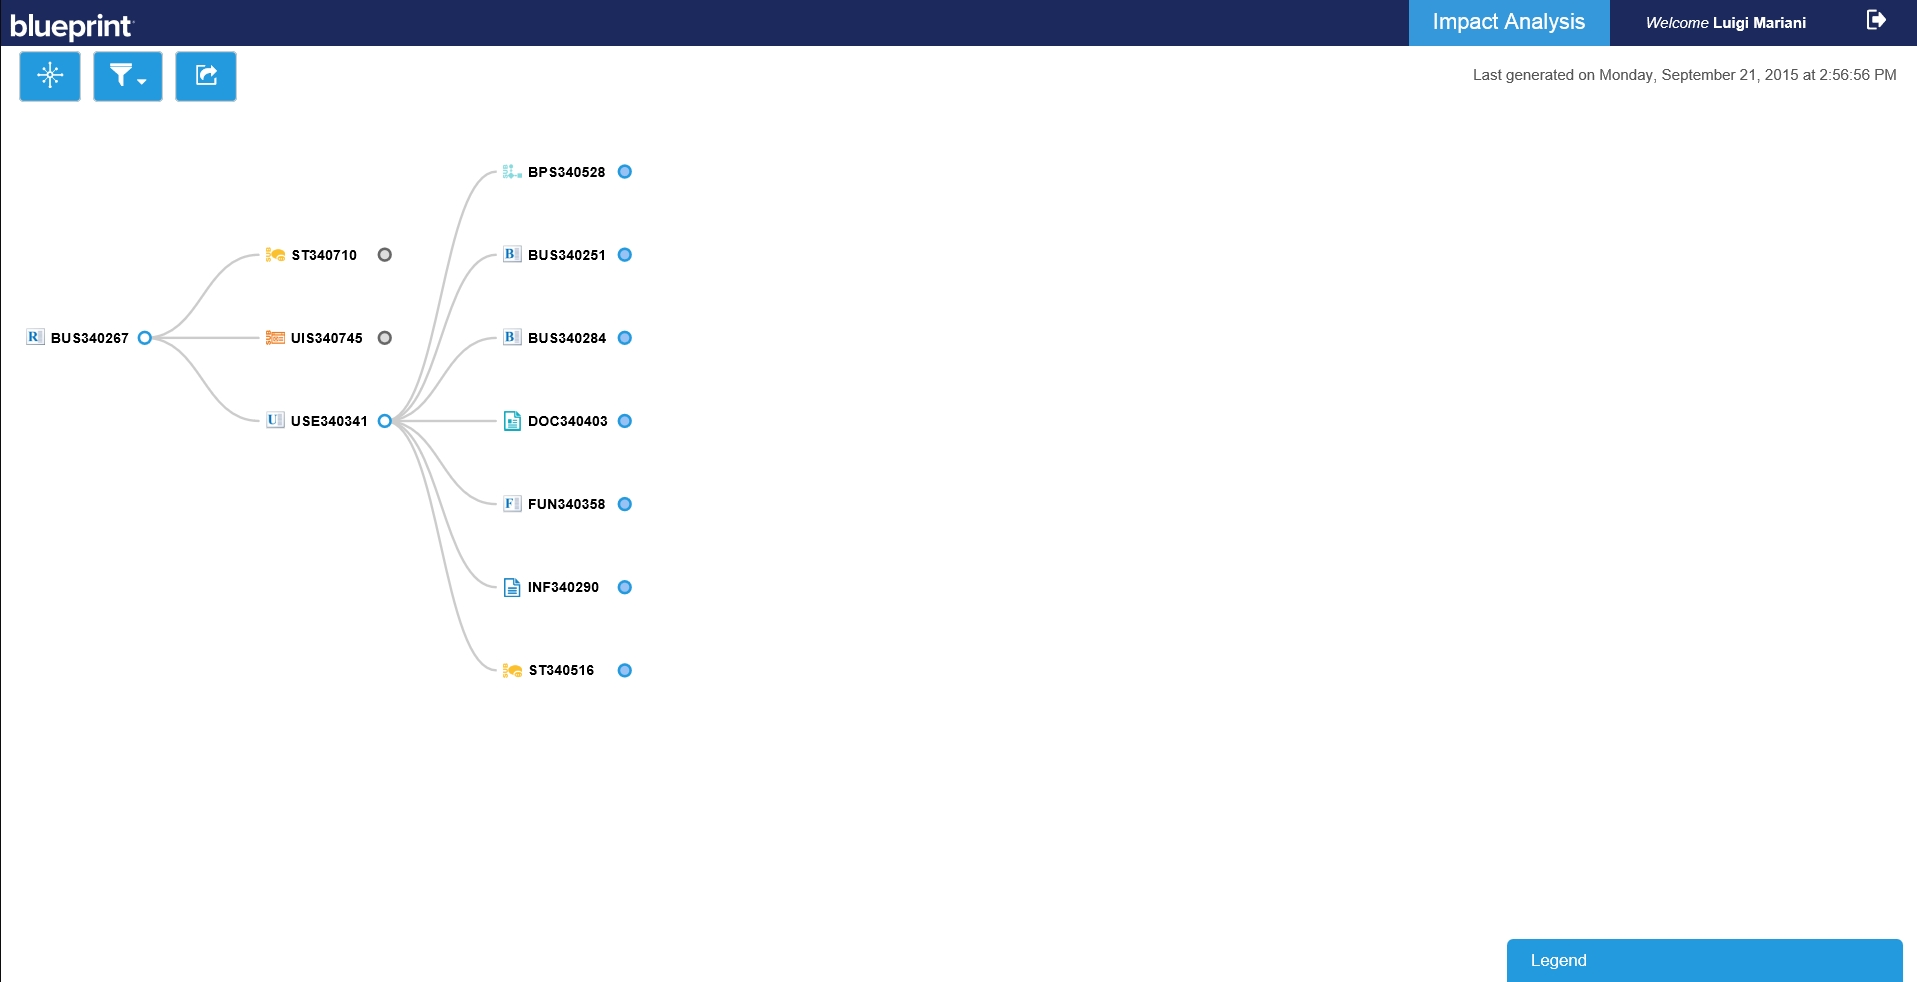
The default display will expand the tree of relationships to 3 levels. A solid blue circle beside an Artifact indicates that there may be another level that can be expanded. Once clicked, if the circle turns grey, it is the last Artifact in that branch. A loop icon  indicates that this Artifact has a loop back to an Artifact in the same relationship. The Impact Analysis module will not display additional branches from an Artifact with this icon. Once a branch is expanded, you can collapse it by clicking the hollow blue circle next to the Artifact. Each time an Impact Analysis is generated, it will be time stamped with a date and time (shown in your local time).
Impact Analysis Interface
There are 3 icons located in the top left of the main screen that allow you to customize your Impact Analysis experience.
 The Source icon allows you to change the source (root)of the highest level Artifact in the tree view
 The Filter allows you to change the Artifact types that are displayed in the tree view. The list of Artifact types is displayed based on the project relationships and organized by project in the filter menu.
 The Export to Excel icon allows you to export the Impact Tree to an Excel document for further analysis.
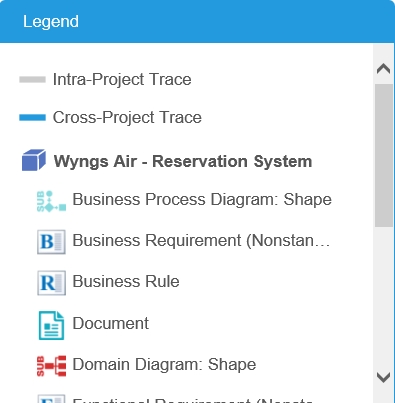
The Legend, located in the bottom on the screen displays the icon and title of each Artifact type that is displayed in the Impact Tree view. The Artifacts in the Legend are grouped by project. The traces between Artifacts can either be intra or cross-project. These are represented by different coloured lines (shown in the Legend).
Properties and Discussions
In the Impact Analysis module, you have the ability to open the key properties of an Artifact or access the discussion function to make comments. To access the Artifact???s properties or to start a discussion related to an Artifact, click an Artifact in the Impact Analysis, and a window will appear with two tabs:
- Properties
- Discussions
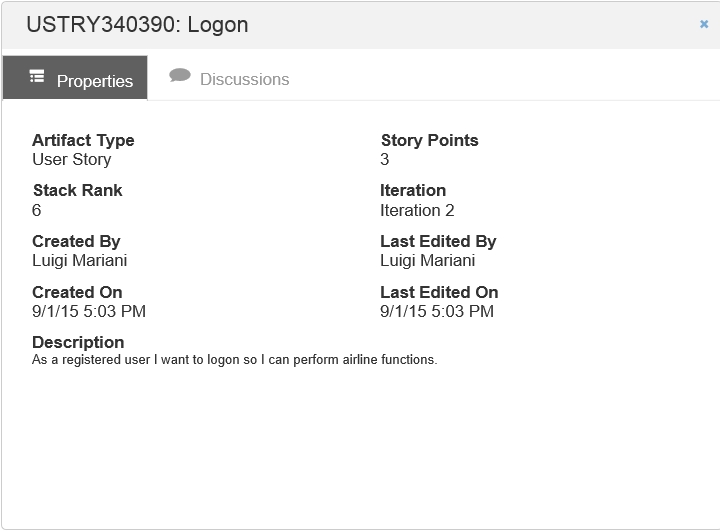
Note: The discussion feature supports rich text and is a real-time field. The comments you enter will be displayed in Blueprint when you return and refresh the Artifact.
Export to Excel
When exporting the Impact Tree to Excel, you must select the number of levels you wish to have exported from the source Artifact. The maximum Impact Analysis supports is 10 levels.
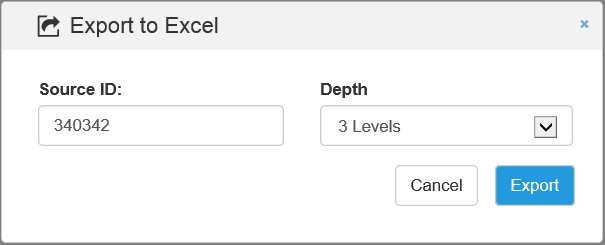
Once you have entered your criteria, click the Export button and an Excel file will be created. Impact Analysis will create a .xlsx file. The name of the file will represent the choices you have selected in the export window.
Example: Source ID 340342 with 3 levels of depth will be generated as ImpactAnalysis_340342_3.xlsx
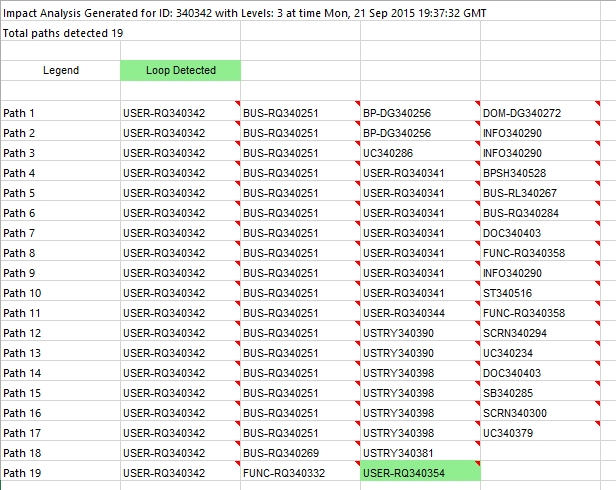
The Excel file will contain a time-stamp for the Impact Analysis, and provide you a total count of paths that were exported. Each path will displayed as it???s own line and will progress until it ends, or a loop is detected (shown in green).
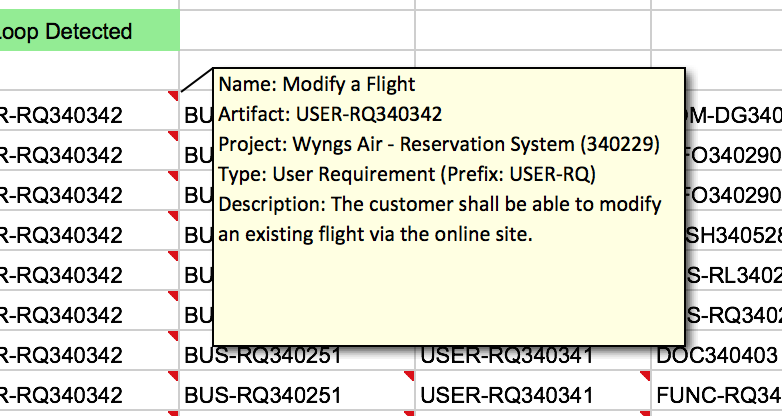
To view the key properties of an Artifact, you can hover your mouse over any of the cells with a red triangle indicator in the upper right.
Learn More
- After the matrix is generated, you can still change the scope and filter the relationships that are displayed. You can filter by relationship type, relationship direction, suspect flag and orphaned items (no specified relationships). After making changes, click the Generate Matrix button to re-generate the traceability matrix.
- You can click the Refresh button at any time to refresh the information in the traceability matrix. This can be useful if you modify artifacts and want the traceability matrix to reflect the changes.
- You can run cross-project coverage analysis. Simply click the drop-down below the search boxes on the Matrix Scope Selection dialog and select another project.
Creating a baseline and viewing baseline contents
A baseline artifact is a snapshot in time of one or more artifacts in a project. Baselines provide you with a reference point for viewing project artifacts as they existed at a particular point in time, even after the artifacts have changed. Baseline artifacts can be included in reviews to obtain feedback and approval.
Perform the following steps to create a baseline:
- Click the Baselines and Reviews folder associated with the Getting Started project. The Baselines and Reviews folder is located in the explorer panel at the bottom of the project.

- Create a new folder to store your baseline and review artifacts. Name the folder [Your Name]'s Baselines and Reviews (example: John Smith's Baselines and Reviews).
- Select the folder that you just created and create a new baseline artifact called My First Baseline.
- Open the baseline artifact and add a description for the baseline.
- Configure the baseline so that all artifacts in the project are included in the baseline contents. To do this, simply click the Select Baseline Contents link and then click the OK button on the Select Baseline Content dialog. By default, all artifacts are selected.
-
Seal the baseline by clicking the Seal Baseline button.
Note: Baselines can be sealed or unsealed:
- Publish your changes.
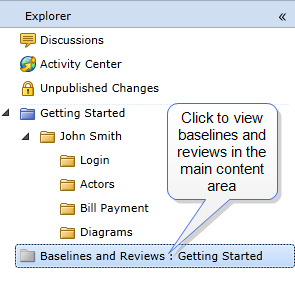
Now that you have sealed and published a baseline, you can open the baseline and view the contents as they existed when the baseline was sealed (or another date, depending on the baseline Timestamp).
- Click the Baselines and Reviews folder associated with the Getting Started project.
- Open the baseline artifact that you created (example: John Smith's First Baseline).
- View the baseline contents by clicking the Open button located on the ribbon (Baselines and Reviews tab, Baselines group).
To close the baseline, right-click the baseline and select Close. When the baseline is open, it appears below the Baselines and Reviews folder in the explorer panel like this: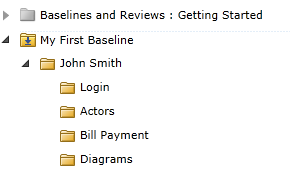
Creating and distributing a review
A review artifact allows you to request artifact feedback and/or approval from stakeholders. Review artifacts can be set to one of two types: informal review (live artifacts), or formal review (baseline artifacts). You can only request approval or electronic signatures on artifacts if they are included in a formal review. If you create an informal review, review participants can add comments to artifacts, but the artifacts cannot be approved.Note: A baseline must be sealed and published before you can include it in the review contents. This ensures that the artifacts do not change while the review is underway.
Now you will create a review using the baseline that you just created, and then distribute it to the review participants.
- Click the Baselines and Reviews folder associated with the Getting Started project.
- Create a new review artifact in your folder called My First Review.
- Open the review artifact and add a description for the review.
- Configure the review contents to include the baseline that you created (that is, My First Baseline) and identify the artifacts that you want approved. To set the review contents, click Select Contents and Approval. Select Formal Review and ensure the baseline is selected on the right side of the dialog with a checkmark beside the artifacts that you want approved.
- Set the review participants. Remember to include yourself as a review participant so you can open the review in the next tutorial. To set the review participants, click the Select Review Participants link, place a checkmark beside the appropriate individuals, and then click OK.
- Adjust the review participant permissions, depending on whether or not you want the review participant to approve artifacts. Ensure that you assign yourself Approver permissions so you can approve artifacts in the next exercise.
- Start the review by clicking the Start Review button. After you start a review, the review participants are notified about the review and can begin reviewing the contents.
Refer to the
Participating in a review using the Reviewers Experience
The Reviewers Experience refers to the user interface used by review participants. This is a very simple yet powerful interface designed specifically for supporting review participant tasks.
Now that you have created and distributed a formal review, you can open the review, comment on the artifacts, and approve or disapprove the artifacts.
- Open My First Review. As a review participants, you can open the review by clicking the URL in the email notification. If you have permissions to open the review artifact, you can simply click the Open Review button to launch the Reviewers Experience.
- Click the View All Artifacts button to view the review contents. As soon as you view the review contents, your status changes from NotStarted to InProgress so the review author can see that you have started the review.
- Try commenting on some of the artifacts.
- Try approving and disapproving artifacts by clicking the Approved and Disapproved buttons on the Reviewers Experience ribbon (Home Tab, Artifact group).
- Change your review status to complete by clicking the Complete the Review button on the ribbon (Home tab, Review group).