
Creating ALM targets
ALM targets provide a connection between Blueprint and your ALM system, allowing you to export artifact information and generated tests to your ALM system.
Note: Integration with the following versions of HP ALM is only available if the HP legacy 32-bit connector has been installed.
Blueprint supports integration with the following ALM systems:
-
HP ALM 11
Note: The Blueprint REST API does not support HP ALM version 11. Native support for HP ALM 11 is available through the COM library and CloudConnect.
-
HP ALM 11.5
-
HP ALM 11.52
-
HP ALM 12
-
Microsoft Team Foundation Server 2010
-
Microsoft Team Foundation Server 2012
-
Microsoft Team Foundation Server 2013
Note: By default, only project administrators and instance administrators with the correct privileges can access new ALM targets. After you create a new target, you must set the target security to grant access to the ALM target so other users can use it.
Tip: Blueprint allows you to create new (empty) targets, or you can create targets based on existing targets in another project.
To create a new ALM target:
-
-
Open the Project Administration Console.
- Click ALM > ALM Targets on the ribbon (Project Admin tab, Project group).
-
-
 Click the New button on the ribbon (Project Admin tab, Actions group) and then select one of the following options:
- HP ALM-COM: Creates a new target connecting Blueprint to HP ALM versions 11 and later.
- HP ALM-REST: Creates a new target that allows you to connect Blueprint to HP ALM versions 11.5 and later using the Blueprint REST API.
- TFS Target: Creates a new TFS target.
- From Existing Project: Creates a new ALM target based on an existing target in another project. If you select this option, you must choose a specific target from another project.
either or .
-
Type a Name for the new target.
-
Set the target Location:
-
Click the
 button. The ALM Connection Editor dialog appears.
 -
Type the URL of the ALM server (example: http://bps-alm10:8080/almbin or http://vmdev:8080/tfs)
Note: If you are accessing the ALM server from the Blueprint Cloud, ensure that you specify the external IP address (instead of the internal IP).
-
Specify a valid User Name.
-
Specify a valid Password.
-
Perform one of the following actions:
-
If you are creating an HP ALM Target:
-
Select the appropriate Domain and Project
-
Select your desired behavior for deleted artifacts:
-
How do you want Blueprint to handle artifacts that are deleted when exporting to HP ALM?: There are two options:
-
Flag them only (via 'Blueprint Deleted'): This option sets the Blueprint Deleted field to Y in your ALM system if items are deleted in Blueprint. In other words, artifacts are not deleted in your ALM system even if they are deleted in Blueprint.
Note: This option requires that you have a Blueprint Deleted field configured in your ALM system.
- Delete them: This option deletes artifacts in your ALM system when artifacts are deleted in Blueprint and the changes are exported to the ALM system.
-
-
-
-
If you are creating a TFS Target:
-
Select the appropriate Team Project Collection and Team Project
-
-
-
Click OK.
-
-
Configure your target options by clicking the Target Options button.
The following options are available for HP ALM Targets:
-
How do you want Blueprint to handle artifacts that are deleted when exporting to HP ALM?: There are two options:
-
Flag them only (via 'Blueprint Deleted'): This option sets the Blueprint Deleted field to Y in your ALM system if items are deleted in Blueprint. In other words, artifacts are not deleted in your ALM system even if they are deleted in Blueprint.
Note: This option requires that you have a Blueprint Deleted field configured in your ALM system.
- Delete them: This option deletes artifacts in your ALM system when artifacts are deleted in Blueprint and the changes are exported to the ALM system.
-
-
Do you want Blueprint to create a hyperlink for each Blueprint relationship so you can easily access related Blueprint artifacts from the ALM system?: If enabled, each exported artifact will contain a hyperlink to each related artifact in Blueprint. If disabled, the exported artifacts will still contain a hyperlink back to the artifact in Blueprint, but will not contain hyperlinks to related artifacts.
-
Do you want Blueprint to export the full artifact hierarchy from the root level?: If enabled, Blueprint exports all folders needed to show the artifact hierarchy from the root level to each exported artifact.
-
Do you want the Change Summary to only report conflicts related to artifacts that are being exported to the ALM system?: If enabled, conflicts are only reported if you are exporting that particular artifact to the ALM system.
-
Do you want Blueprint to maintain the Blueprint hierarchy of artifacts after exporting to HP ALM?: If enabled, Blueprint exports artifacts without impacting a modified artifact hierarchy in ALM. In other words, you can move or alter the hierarchy of artifacts in ALM and maintain that structure after re-exporting the artifacts from Blueprint. This feature allows you to maintain a custom structure in ALM and still take advantage of Blueprint???s ability to export artifact changes.
-
Do you want to export text fields with Rich Text formatting?: If enabled, Blueprint exports text fields with full rich text formatting. If this option is not enabled, Blueprint exports plain text only.
-
What would you like the "Export Path" set to by default in the Export Wizard?: Allows you to make the export easier for users by setting a default export path. If the user does not explicitly set an export path, this default will be used for the export.
The following options are available for TFS Targets:
-
Do you want Blueprint to create a hyperlink for each Blueprint relationship so you can easily access related Blueprint artifacts from the ALM system?: If enabled, each exported artifact will contain a hyperlink to each related artifact in Blueprint. If disabled, the exported artifacts will still contain a hyperlink back to the artifact in Blueprint, but will not contain hyperlinks to related artifacts.
-
Do you want Blueprint to export the full artifact hierarchy from the root level?: If enabled, Blueprint exports all folders needed to show the artifact hierarchy from the root level to each exported artifact.
-
Do you want the Change Summary to only report conflicts related to artifacts that are being exported to the ALM system?: If enabled, conflicts are only reported if you are exporting that particular artifact to the ALM system.
-
Do you want to export text fields with Rich Text formatting?: If enabled, Blueprint exports text fields with full rich text formatting. If this option is not enabled, Blueprint exports plain text only.
-
What would you like the "Area Path" set to by default in the Export Wizard?: Allows you to make the export easier for users by setting a default area path. If the user does not explicitly set an area path, this default will be used for the export.
-
-
Configure the mapping details:
The mapping details allow you map each artifact type to a data field in your ALM system.
-
For each Artifact Type, click the drop-down in the External Type column and select a data type.
Tip: If the
 icon appears, there is a conflict you must resolve. Resolve the issue and click the Validate Target button to re-validate your settings.
 -
For each Artifact Type, click the Edit... button and configure the property mappings on the ALM Field Mapping Editor dialog.
The ALM properties are displayed on rightmost side. Using the drop-down options, map each Blueprint property (on the left) to an ALM property (on the right).
Note: You can map the same Blueprint properties to multiple ALM properties.
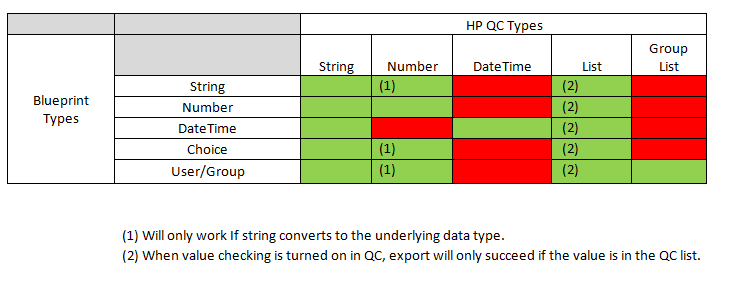
Below are the high-level mapping rules for Blueprint to HP ALM:

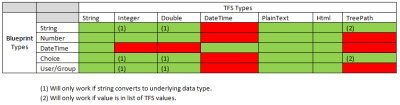
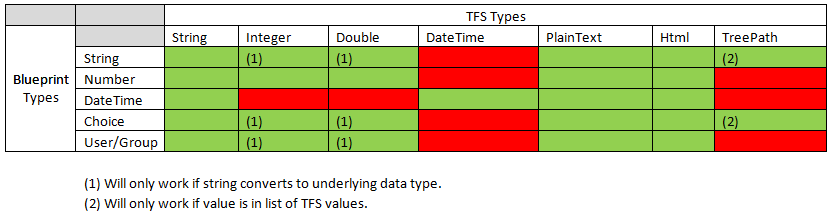
Below are the high-level mapping rules for Blueprint to TFS:
- When you are finished, click OK to close the dialog.
-
- Click Save.
You may want to consider setting up the target security to control which users have access to export to the new target.
Learn More
Managing ALM targets and security